Laplacian Centrality in NetworkX (Python)

The other day I read a few papers on a new algorithm for calculating centrality in networks. Below are the two papers describing the Laplacian Centrality metric. The first is for non-weighted networks, and the second for weighted networks.

  • Qi, X., Duval, R. D., Christensen, K., Fuller, E., Spahiu, A., Wu, Q., Wu, Y., Tang, W., and Zhang, C. (2013). Terrorist networks, network energy and node removal: A new measure of centrality based on laplacian energy. Social Networking, 02(01):19-31.
  • Qi, X., Fuller, E., Wu, Q., Wu, Y., and Zhang, C.-Q. (2012). Laplacian centrality: A new centrality measure for weighted networks. Information Sciences, 194:240-253. PDF Here.

The metric is fairly intuitive I think. The centrality parameter is a function of the local degree plus the degree’s of the neighbors (with different weights for each). I figured it would be a quick programming exercise (which means I spent way too long trying to implement it!). To follow is some code that replicates the measures for both weighted and non-weighted graphs, using the Python networkx library.

The non-weighted graph code is easy, and is a near copy-paste from some igraph code snippet that was already available. Just some updates to idiom’s for NetworkX specifically. The norm option specifies whether you want solely the numerator value, the difference between the energy in the full graph versus the graph with the node removed (norm=False), or whether you want to divide this value by the energy for the full graph. Note this function ignores the weights in the graph. nbunch is if you want to pass the function only a subset of points to calculate the centrality. (If you do that you might as well have norm=False for time savings as well.)

def lap_cent(graph, nbunch=None, norm=False):
  if nbunch is None:
    vs = graph.nodes()
  else:
    vs = nbunch
  degrees = graph.degree(weight=None)
  if norm is True:
    den = sum(v**2 + v for i,v in degrees.items())
    den = float(den)
  else:
    den = 1
  result = []
  for v in vs:
    neis = graph.neighbors(v)
    loc = degrees[v]
    nei = 2*sum(degrees[i] for i in neis)
    val = (loc**2 + loc + nei)/den
    result.append(val)
  return result

The weighted network is a bit more tricky though. I thought coding all of the two walks seemed a royal pain, so I developed a different algorithm that I believe is quicker. Here are three functions, but the last one is the one of interest, lap_cent_weighted. The options are similar to the unweighted version, with the exception that you can pass a weight attribute (which is by default named ‘weight’ in NetworkX graphs).

def lap_energy(graph, weight='weight'):
  degrees = graph.degree(weight=weight)
  d1 = sum(v**2 for i,v in degrees.items())
  wl = 0
  for i in graph.edges(data=True):
    wl += (i[2].get(weight))**2
  return [d1,2*wl]

def cw(graph,node,weight='weight'):
  neis = graph.neighbors(node)
  ne = graph[node]
  cw,sub = 0,0
  for i in neis:
    we = ne[i].get(weight)
    od = graph.degree(i,weight=weight)
    sub += -od**2 + (od - we)**2
    cw += we**2
  return [cw,sub]

def lap_cent_weighted(graph, nbunch=None, norm=False, weight='weight'):
  if nbunch is None:
    vs = graph.nodes()
  else:
    vs = nbunch
  if norm == True:
    fe = lap_energy(graph,weight=weight)
    den = float(fe[0]+fe[1])
  else:
    den = 1
  result = []
  for i in vs:
     d2 = graph.degree(i,weight=weight)
     w2 = cw(graph,i,weight=weight)
     fin = d2**2 - w2[1] + 2*w2[0]
     result.append(fin/den)
  return result

For a brief overview of the new algorithm (in some quick and dirty text math), to define the energy of the entire graph it is:

sum(di^2) + 2*sum(wij^2)   (1)

Where di are the degrees for all i nodes, and the second term is 2 times the sum of the weights squared. So when you take out a particular node, say ‘A’, the drop in the second term is easy, just iterate over the neighbors of ‘A’, and calculate 2*sum(waj^2), then subtract that from the second term in equation 1.

The first term is slightly more complex. First there is a decrease due to simply the degree of the removed node, da^2. There is also a decrease in the degree on the neighboring nodes as well, so you need to calculate their updated contribution. The necessary info. is available when you iterate over the neighbor list though, and if the original contribution is di^2, and the weight of wia, then the updated weight is -di^2 + (di - wia)^2. You can calculate this term at the same time you calculate the decrease in the weights in the second term.

I believe this algorithm is faster than the one originally written in the second paper. It should be something like O(n*a), where a is the average number of neighbors for the entire graph, and n are the number of nodes. Or in worst case a is the maximum number of neighbors any node has in the graph (which should be less than or equal to the max degree in a weighted graph).

Here is an example of using the functions with the small, toy example in the weighted network paper. Note that the lap_cent function ignores the weights.

import networkx as nx

Gp = nx.Graph()
ed = [('A','B',4),('A','C',2),('C','B',1),('B','D',2),('B','E',2),('E','F',1)]
Gp.add_weighted_edges_from(ed)

x = lap_cent(Gp)
xw = lap_cent_weighted(Gp, norm=True)
for a,b,c in zip(Gp.nodes(),x,xw):
  print a,b,c

Which prints out at the console:

A 18 0.7 
C 18 0.28 
B 34 0.9 
E 16 0.26 
D 10 0.22 
F 6 0.04

If you want to see that the graph is the same as the graph in the weighted Qi paper, use below.

import matplotlib.pyplot as plt
pos=nx.spring_layout(Gp) # positions for all nodes
nx.draw(Gp,pos=pos)
nx.draw_networkx_labels(Gp,pos=pos)
nx.draw_networkx_edge_labels(Gp,pos=pos)
plt.show()

Fuzzy matching in SPSS using a custom python function

The other day I needed to conduct propensity score matching, but I was working with geographic data and wanted to restrict the matches to within a certain geographic distance. To do this I used the FUZZY extension command, which allows you to input a custom function. To illustrate I will be using some example data from my dissertation, and the code and data can be downloaded here.

So first lets grab the data and reduce it down a bit to only the variables we will be using. This dataset are street segments and intersections in DC, and the variables are crime, halfway houses, sidewalk cafes, and bars. Note to follow along you need to update the file handle to your machine.

FILE HANDLE save /NAME = "!!!Your Handle Here!!!".
GET FILE = "save\BaseData.sav".
DATASET NAME DC_Data.
SORT CASES BY MarID.

*Reduce the variable list down a bit.
MATCH FILES FILE = * /KEEP  MarID XMeters YMeters OffN1 OffN2 OffN3 OffN4 OffN5 OffN6 OffN7 OffN8 OffN9 
                            TotalCrime HalfwayHouse SidewalkCafe TypeC_D.

Now as a quick illustration, I am going to show a propensity score analysis predicting the location of halfway houses in DC – and see if street units with a halfway house are associated with more violence. Do not take this as a serious analysis, just as an illustration of the workflow. The frequency shows there are only 9 halfway houses in the city, and the compute statements collapse crimes into violent and non-violent. Then I use PLUM to fit the logistic model predicting the probability of treatment. I use non-violent crimes, sidewalk cafes, and bars as predictors.

FREQ HalfwayHouse.
COMPUTE Viol = OffN1 + OffN4 + OffN5 + OffN6.
COMPUTE NonViol = OffN2 + OffN3 + OffN7 + OffN8 + OffN9.

*Fitting logit model via PLUM.
PLUM HalfwayHouse WITH NonViol SidewalkCafe TypeC_D
  /CRITERIA=CIN(95) DELTA(0) LCONVERGE(0) MXITER(100) MXSTEP(5) PCONVERGE(1.0E-6) SINGULAR(1.0E-8)
  /LINK=LOGIT
  /PRINT=FIT PARAMETER SUMMARY
  /SAVE=ESTPROB.

The model is very bad, but we can see that sidewalk cafes are never associated with a halfway house! (Again this is just an illustration – don’t take this as a serious analysis of the effects of halfway houses on crime.) Now we need to make a custom function with which to restrict matches not only based on the probability of treatment, but also based on the geographic location. Here I made a file named DistFun.py, and placed in it the following functions:

#These functions are for SPSS's fuzzy case control matching
import math
#distance under 500, and caliper within 0.02
def DistFun(d,s):
  dx = math.pow(d[1] - s[1],2)  
  dy = math.pow(d[2] - s[2],2)  
  dis = math.sqrt(dx + dy)
  p = abs(d[0] - s[0])
  if dis < 500 and p < 0.02:
    t = 1
  else:
    t = 0
  return t
#distance over 500, but under 1500
def DistBuf(d,s):
  dx = math.pow(d[1] - s[1],2)  
  dy = math.pow(d[2] - s[2],2)  
  dis = math.sqrt(dx + dy)
  p = abs(d[0] - s[0])
  if dis  500 and p < 0.02:
    t = 1
  else:
    t = 0
  return t

The FUZZY command expects a function to return either a 1 for a match and 0 otherwise, and the function just takes a fixed set of vectors. The first function DistFun, takes a list where the first two elements are the coordinates, and the last element is the probability of treatment. It then calculates the euclidean distance, and returns a 1 if the distance is under 500 and the absolute distance in propensity scores is under 0.02. The second function is another example if you want matches not too close but not too far away, at a distance of between 500 and 1500. (In this dataset my coordinates are projected in meters.)

Now to make the research reproducible, what I do is save this python file, DistFun.py, in the same folder as the analysis. To make this an importable function in SPSS for FUZZY you need to do two things. 1) Also have the file __init__.py in the same folder (Jon Peck made the comment this is not necessary), and 2) add this folder to the system path. So back in SPSS we can add the folder to sys.path and check that our function is importable. (Note that this is not permanent change to the PATH system variable in windows, and is only active in the same SPSS session.)

*Testing out my custom function.
BEGIN PROGRAM Python.
import sys
sys.path.append("!!!Your\\Path\\Here!!!\\")

import DistFun

#test case
x = [0,0,0.02]
y = [0,499,0.02]
z = [0,500,0.02]
print DistFun.DistFun(x,y)
print DistFun.DistFun(x,z)
END PROGRAM.

Now we can use the FUZZY command and supply our custom function. Without the custom function you could specify the distance in any one dimension on the FUZZ command (e.g. here something like FUZZ = 0.02 500 500), but this produces a box, not a circle. Also with the custom function you can do more complicated things, like my second buffer function. The function takes the probability of treatment along with the two spatial coordinates of the street unit.

*This uses a custom function I made to restrict matches to within 500 meters.
FUZZY BY=EST2_1 XMeters YMeters SUPPLIERID=MarID NEWDEMANDERIDVARS=Match1 Match2 Match3 GROUP=HalfwayHouse CUSTOMFUZZ = "DistFun.DistFun"
    EXACTPRIORITY=FALSE  
MATCHGROUPVAR=MGroup 
/OPTIONS SAMPLEWITHREPLACEMENT=FALSE MINIMIZEMEMORY=TRUE SHUFFLE=TRUE SEED=10.

This takes less than a minute, and in this example provides a full set of matches for all 9 cases (not surprising, since the logistic regression equation predicting halfway house locations is awful). Now to conduct the propensity score analysis just takes alittle more data munging. Here I make a second data of just the matched locations, and then reshape the cases and controls so they are in long format. Then I merge the original data back in.

*Reshape, merge back in, and then conduct outcome analysis.
DATASET COPY PropMatch.
DATASET ACTIVATE PropMatch.
SELECT IF HalfwayHouse = 1.
VARSTOCASES /MAKE MarID FROM MarID Match1 Match2 Match3
            /INDEX Type
            /KEEP MGroup.

*Now remerge original data back in.
SORT CASES BY MarID.
MATCH FILES FILE = *
  /TABLE = 'DC_Data'
  /BY MarID. 

Now you can conduct the analysis. For example most people use t-tests both for the outcome and to assess balance on the pre-treatment variables.

*Now can do your tests.
T-TEST GROUPS=HalfwayHouse(0 1)
  /MISSING=ANALYSIS
  /VARIABLES=Viol
  /CRITERIA=CI(.95).

One of my next projects will be to use this workflow to conduct fuzzy name matching within and between police databases using custom string distance functions.

Passing arguments to SPSSINC TRANS (2)

Jon Peck made some great comments on my prior post on passing arguments to the SPSSINC TRANS function. Besides advice on that I should be quoting the argument on the FORMULA statement, he gave examples of how you can use the "TO" argument in both passing variables lists within the python formula and assigning variables to the results. Here is a brief example of their use.

First I will be working with a tiny, toy dataset:

DATA LIST FREE / X1 TO X4.
BEGIN DATA
1 2 3 4
5 6 7 8
9 8 7 6
5 4 3 2
END DATA.
DATASET NAME Test.

Now here is a command that returns the second lowest value in a list. (While there are plenty of things you can do in base code, this python code is very simple compared to what you would have to do in vanilla SPSS to figure this out.) In a nutshell you can specify the variable list on the /VARIABLE subcommand (and mix in TO to specify adjacent variables as in most SPSS commands). And then insert these into the python formula by specifying <>.

SPSSINC TRANS RESULT = Second
  /VARIABLES X1 TO X4
  /FORMULA "sorted([<>])[1]".

In my prior post, I showed how you could do this for the original variables, which would look like /FORMULA "sorted([X1,X2,X3,X4])[1]". Here you can see I’ve specified a set of variables on the VARIABLES subcommand, and inserted them into a list using [<>]. Enclosing <> in brackets produces a list in python. I then sort the list and grab the second element (located at 1, since python uses 0 based indices). You can also mix variables in the dataset and the <> listed on the variables subcommand. See here for an example.

You can also use the TO modifier in making a new set of variables. Here I return the sorted variables X1 TO X4 as a new set of variables S1 TO S4.

SPSSINC TRANS RESULT = S1 TO S4
  /VARIABLES X1 TO X4
  /FORMULA "sorted([<>])".

In both the prior examples I omitted the TYPE argument, as it defaults to 0 (i.e. a numeric variable returned as a float). But when specifying variable lists of the same type for multiple variables you can simply specify the type one time and the rest of the results are intelligently returned as the same. Here is the same sorted example, except that I return the results each as a string of length 1 as opposed to a numeric value.

SPSSINC TRANS RESULT = A1 TO A4 TYPE = 1
  /VARIABLES X1 TO X4 
  /FORMULA "map(str, sorted([<>]))".

Passing arguments to SPSSINC TRANS

So I actually bothered to read the help the other day for SPSSINC TRANS, which being generic allows you to use Python functions similar to how COMPUTE statements work, just a bit more general. Two examples of passing arguments I did not know you could do were 1) pass a list as an argument, and 2) pass constants that aren’t SPSS variables to functions. To follow are a few brief examples.

The first is passing a list to a function, and here is a simple example using the Python function sorted().

DATA LIST FREE / X1 X2 X3.
BEGIN DATA
3 2 1
1 0 3
1 1 2
2 2 1
3 0 3
END DATA.
DATASET NAME Test.

SPSSINC TRANS RESULT=S1 S2 S3 TYPE=0
  /FORMULA sorted([X1,X2,X3]).

This takes the variables X1 to X3, sorts them, and returns them in a new set of variables S1 to S3. We can also do reverse sorting by passing a constant value of 1 to the reverse function, which acts synonymously with reverse=True.

SPSSINC TRANS RESULT=RS1 RS2 RS3 TYPE=0
  /FORMULA sorted([X1,X2,X3],reverse=1).

This is a rather simplistic example, but the action is much simpler in Python than whatever equivalent SPSS code you can come up with. When using the SPSSINC TRANS extension it expects the returned function to simply be a flat list. For this sorting situation though it might be convenient to return the order in which the original value was stored. Here I make a function that returns the indice of the original list, and then flattens the two into sequential order, per this SO answer.

BEGIN PROGRAM Python.
import itertools

def SortList(L,reverse=0):
  I = range(1,len(L)+1)
  x = sorted(zip(L,I),reverse=reverse)
  r = list(itertools.chain.from_iterable(x))
  return r

#example use
print SortList(L=[2,1,3])
print SortList(L=[2,1,3],reverse=1)
END PROGRAM.

MATCH FILES FILE = * /DROP S1 TO RS3.

SPSSINC TRANS RESULT= S1 T1 S2 T2 S3 T3 TYPE=0
  /FORMULA SortList([X1,X2,X3],reverse=1).

When passing a string constant to a function in SPSSINC TRANS you need to triple quote the string. This makes some of my prior examples of using the Google maps related API’s much simpler. Instead of making variables to pass to the function, you can just triple quote the constants. Also when using the maps API I often have an argument for the API key, but you will get results even without a key (I presume Google just checks the IP address an limits you after so many requests). So for many of my functions you can not worry about making an API key and just pass an empty string. Here is an example from my prior Google distance API post using string constants and no API key.

BEGIN PROGRAM Python.
import urllib, json

#This parses the returned json to pull out the distance in meters and
#duration in seconds, [None,None] is returned is status is not OK
def ExtJsonDist(place):
  if place['rows'][0]['elements'][0]['status'] == 'OK':
    meters = place['rows'][0]['elements'][0]['distance']['value']
    seconds = place['rows'][0]['elements'][0]['duration']['value']
  else:
    meters,seconds = None,None
  return [meters,seconds]

#Takes a set of lon-lat coordinates for origin and destination,
#plus your API key and returns the json from the distance API
def GoogDist(OriginX,OriginY,DestinationX,DestinationY,key):
  MyUrl = ('https://maps.googleapis.com/maps/api/distancematrix/json'
           '?origins=%s,%s'
           '&destinations=%s,%s'
           '&key=%s') % (OriginY,OriginX,DestinationY,DestinationX,key)
  response = urllib.urlopen(MyUrl)
  jsonRaw = response.read()
  jsonData = json.loads(jsonRaw)
  data = ExtJsonDist(jsonData)
  return data
END PROGRAM.

*Grab the online data.
DATASET CLOSE ALL.
SPSSINC GETURI DATA
URI="https://dl.dropboxusercontent.com/u/3385251/NewYork_ZipCentroids.sav"
FILETYPE=SAV DATASET=NY_Zips.

*Selecting out only a few.
SELECT IF $casenum <= 5.
EXECUTE.

SPSSINC TRANS RESULT=Meters Seconds TYPE=0 0 
/FORMULA GoogDist(OriginX=LongCent,OriginY=LatCent,DestinationX='''-78.276205''',DestinationY='''42.850721''',key=''' ''').

Extracting items from SPSS tables using Python

Sometimes there are calculations provided for in SPSS tables that are necessary to use for other calculations. A frequent one is to grab certain percentiles from a FREQUENCY table (Equal Probability Histograms in SPSS is one example). The typical way to do this is to grab the table using OMS, but where that is overkill is if you need to merge this info. back into the original data for further calculations. I will show a brief example of grabbing the 25th, 50th, and 75th percentiles from a frequency table and using Python to calculate a robust standardized variable using these summary statistics.

First we will make a set of random data to work with.

SET SEED 10.
MATRIX.
SAVE {UNIFORM(100,1)} /OUTFILE = *.
END MATRIX.
DATASET NAME U.
FREQ COL1 /FORMAT = NOTABLE /PERCENTILES = 25 50 75.

The frequency table we are working with then looks like:

Now to get to the items in this frequency table we just to do a bit of going down a rabbit hole of different python objects.

  • The first block grabs the items in the output, which include tables and text.
  • The second block then grabs the last table for this specific output. Note that minus 2 from the size of the list is necessary because Python uses zero based indices and there is a log item after the table. So if the size of the list is 10, that means list[9] is the last item in the list. (Using negative indices does not work for extracting from the OutputItemList object.)
  • The third part then grabs the quantiles from the indices of the table. It ends up being in the first data column (so zero) and in the 3rd, 4th and 5th rows (again, Python uses zero based indices). Using GetUnformattedValueAt grabs the floating point number.
  • The final part then uses these quantiles to calculate a robust normalized variable by using spss.Submit and string substitution. (And then closes the SPSS client at the end.)

BEGIN PROGRAM Python.
import SpssClient, spss

#start the client, grab the items in the output
SpssClient.StartClient()
OutputDoc = SpssClient.GetDesignatedOutputDoc()
OutputItemList = OutputDoc.GetOutputItems()

#Grab the last table, 0 based index
lastTab = OutputItemList.Size() - 2
OutputItem = OutputItemList.GetItemAt(lastTab)
PivotTable = OutputItem.GetSpecificType()
SpssDataCells = PivotTable.DataCellArray()

#Grab the specific quantiles
Q25 = float(SpssDataCells.GetUnformattedValueAt(2,0))
Q50 = float(SpssDataCells.GetUnformattedValueAt(3,0))
Q75 = float(SpssDataCells.GetUnformattedValueAt(4,0))
print [Q25,Q50,Q75]

#Use these stats in SPSS commands
spss.Submit("COMPUTE QuantNormX = ( COL1 - %(Q50)f )/( %(Q75)f - %(Q25)f )." % locals())
SpssClient.StopClient()
END PROGRAM.

While the python code in terms of complexity is just about the same as using OMS to grab the frequency table and merge the quantiles back into the original data, this will be much more efficient. I can imagine using this for other projects too, like grabbing coefficients from a regression model and estimating certain marginal effects.

Using the New York State Online Geocoding API with Python

I’ve been very lucky doing geographic analysis in New York state, as the majority of base map layers I need, and in particular streets centerline files for geocoding, are available statewide at the NYS GIS Clearing house. I’ve written in the past how to use various Google API’s for geo data, and here I will show how one can use the NYS SAM Address database and their ESRI online geocoding service. I explored this because Google’s terms of service are restrictive, and the NYS composite locator should be more comprehensive/up to date in matches (in theory).

So first, this is basically the same as with most online API’s (at least in my limited experience), submit a particular url and get JSON in return. You just then need to parse the JSON for whatever info you need. This is meant to be used within SPSS, but the function works with just a single field address string and returns the single top hit in a list of length 3, with the unicode string address, and then the x and y coordinates. (The function is of course a valid python function, so you could use this in any environment you want.) The coordinates are specified using ESRI’s WKID (see the list for projected and geographic coordinate systems). In the code I have it fixed as WKID 4326, which is WGS 1984, and so returns the longitude and latitude for the address. When the search returns no hits, it just returns a list of [None,None,None].

*Function to use NYS geocoding API.
BEGIN PROGRAM Python.
import urllib, json

def ParsNYGeo(jBlob):
  if not jBlob['candidates']:
    data = [None,None,None]
  else:
    add = jBlob['candidates'][0]['address']
    y = jBlob['candidates'][0]['location']['y']
    x = jBlob['candidates'][0]['location']['x']
    data = [add,x,y]
  return data

def NYSGeo(Add, WKID=4326):
  base = "http://gisservices.dhses.ny.gov/arcgis/rest/services/Locators/SAM_composite/GeocodeServer/findAddressCandidates?SingleLine="
  wkid = "&maxLocations=1&outSR=4326"
  end = "&f=pjson"
  mid = Add.replace(' ','+')
  MyUrl = base + mid + wkid + end
  soup = urllib.urlopen(MyUrl)
  jsonRaw = soup.read()
  jsonData = json.loads(jsonRaw)
  MyDat = ParsNYGeo(jsonData)
  return MyDat

t1 = "100 Washington Ave, Albany, NY"
t2 = "100 Washington Ave, Poop"

Out = NYSGeo(t1)
print Out

Empt = NYSGeo(t2)
print Empt
END PROGRAM.

So you can see in the code sample that you need both the street address and the city in one field. And here is a quick example with some data in SPSS. Just the zip code doesn’t return any results. There is some funny results here though in this test run, and yes that Washington Ave. extension has caused me geocoding headaches in the past.

*Example using with SPSS data.
DATA LIST FREE / MyAdd (A100).
BEGIN DATA
"100 Washington Ave, Albany"
"100 Washinton Ave, Albany"
"100 Washington Ave, Albany, NY 12203"
"100 Washington Ave, Albany, NY, 12203"
"100 Washington Ave, Albany, NY 12206"
"100 Washington Ave, Poop"
"12222"
END DATA.
DATASET NAME NY_Add.

SPSSINC TRANS RESULT=GeoAdd lon lat TYPE=100 0 0 
  /FORMULA NYSGeo(Add=MyAdd).

LIST ALL.

String substitution in Python continued

On my prior post Jon and Jignesh both made the comment that using locals() in string substitution provides for easier to read code – and is a great recommendation. What locals() does is grab the object from the local environment, so in your string if you place %(MyObject)s, and in the prior part of your code you have MyObject = "foo", it will substitute foo into the string. Using the same prior code, here is an example:

BEGIN PROGRAM Python.

var = ["V1","V2","V3"]
lab = ["Var 1","Var 2","Var 3"]

for v,l in zip(var,lab):
  spss.Submit("""
*Descriptive statistics.
FREQ %(v)s.
CORRELATIONS /VARIABLES=X1 X2 X3 %(v)s.
*Graph 1.
GRAPH /SCATTERPLOT(BIVAR)=X1 WITH %(v)s /TITLE = "%(l)s".
*Graph 2.
GRAPH /SCATTERPLOT(BIVAR)=X2 WITH %(v)s /TITLE = "%(l)s".
*Graph 3.
GRAPH /SCATTERPLOT(BIVAR)=X3 WITH %(v)s /TITLE = "%(l)s".
""" % (locals()))

END PROGRAM.

This ends up working in a similar fashion to the dictionary substitution I mentioned, just that Python makes the dictionary for you. Here is the same prior example using the dictionary with % substitution:

BEGIN PROGRAM Python.

var = ["V1","V2","V3"]
lab = ["Var 1","Var 2","Var 3"]

MyDict = {"a":v, "b":l}

for v,l in zip(var,lab):
  spss.Submit("""
*Descriptive statistics.
FREQ %(a)s.
CORRELATIONS /VARIABLES=X1 X2 X3 %(a)s.
*Graph 1.
GRAPH /SCATTERPLOT(BIVAR)=X1 WITH %(a)s /TITLE = "%(b)s".
*Graph 2.
GRAPH /SCATTERPLOT(BIVAR)=X2 WITH %(a)s /TITLE = "%(b)s".
*Graph 3.
GRAPH /SCATTERPLOT(BIVAR)=X3 WITH %(a)s /TITLE = "%(b)s".
""" % (MyDict) )

END PROGRAM.

And finally here is this example using a string template. It is basically self-explanatory.

*Using a string template.
BEGIN PROGRAM Python.
from string import Template

#Making template
c = Template("""*Descriptive statistics.
FREQ $var.
CORRELATIONS /VARIABLES=X1 X2 X3 $var.
*Graph 1.
GRAPH /SCATTERPLOT(BIVAR)=X1 WITH $var /TITLE = "$lab".
*Graph 2.
GRAPH /SCATTERPLOT(BIVAR)=X2 WITH $var /TITLE = "$lab".
*Graph 3.
GRAPH /SCATTERPLOT(BIVAR)=X3 WITH $var /TITLE = "$lab".
""")

#now looping over variables and labels
var = ["V1","V2","V3"]
lab = ["Var 1","Var 2","Var 3"]
for v,l in zip(var,lab):
  spss.Submit(c.substitute(var=v,lab=l))
END PROGRAM.

The template solution is nice because it can make the code a bit more modular (i.e. you don’t have huge code blocks within a loop). The only annoyance I can see with this is that $ does come up in SPSS code on occasion with the few system defined variables, so it needs to be escaped with a second $.

String substitution in Python

I recently had a set of SPSS syntax that iterated over multiple variables and generated many similar graphs. They were time series graphs of multiple variables, so the time stayed the same but the variable on the Y axis changed and the code also changed the titles of the graphs. Initially I was using the % string substitution with a (long) list of replacements. Here is a brief synonymous example.

*Creating some fake data.
MATRIX.
SAVE {UNIFORM(100,6)} /OUTFILE = * /VARIABLES = V1 TO V3 X1 TO X3.
END MATRIX.
DATASET NAME x.

*Crazy long string substitution.
BEGIN PROGRAM Python.
import spss

#my variable and label lists
var = ["V1","V2","V3"]
lab = ["Var 1","Var 2","Var 3"]

for v,l in zip(var,lab):
  spss.Submit("""
*Descriptive statistics.
FREQ %s.
CORRELATIONS /VARIABLES=X1 X2 X3 %s.
*Graph 1.
GRAPH /SCATTERPLOT(BIVAR)=X1 WITH %s /TITLE = "%s".
*Graph 2.
GRAPH /SCATTERPLOT(BIVAR)=X2 WITH %s /TITLE = "%s".
*Graph 3.
GRAPH /SCATTERPLOT(BIVAR)=X3 WITH %s /TITLE = "%s".
""" % (v,v,v,l,v,l,v,l))
END PROGRAM.

When you only have to substitute one or two things, "str %s and %s" % (one,two) is no big deal, but here is quite annoying having to keep track of the location of all the separate variables when the list grows. Also we are really just recycling the same object to be replaced multiple times. I thought this is python, so there must be an easier way, and sure enough there is! A simple alternative is to use the format modifier to a string object. Format can take a vector of arguments, so the prior example would be "str {0} and {1}".format(one,two). Instead of %s, you place brackets and the index position of the argument (and Python has zero based indices, so the first element is always 0).

Here is the SPSS syntax updated to use format for string substitution.

*This is much simpler using ".format" for substitution.
BEGIN PROGRAM Python.

var = ["V1","V2","V3"]
lab = ["Var 1","Var 2","Var 3"]

for v,l in zip(var,lab):
  spss.Submit("""
*Descriptive statistics.
FREQ {0}.
CORRELATIONS /VARIABLES=X1 X2 X3 {0}.
*Graph 1.
GRAPH /SCATTERPLOT(BIVAR)=X1 WITH {0} /TITLE = "{1}".
*Graph 2.
GRAPH /SCATTERPLOT(BIVAR)=X2 WITH {0} /TITLE = "{1}".
*Graph 3.
GRAPH /SCATTERPLOT(BIVAR)=X3 WITH {0} /TITLE = "{1}".
""".format(v,l))    
END PROGRAM.

Much simpler. You can use a dictionary with the % substitution to the same effect, but here the format modifier is a quite simple solution. Another option I might explore more in the future are using string templates, which seem a good candidate for long strings of SPSS code.

Repeating Charts in SPSS for unique IDs

The title is probably not that clear, but I’ve seen this request a few times and have used this trick in one my projects, so figured it would be a worthwhile topic to illustrate. So the problem is you have a background distribution, and you want to tailor a set of individual charts showing the unique individuals score against the background distribution. See two examples (1,2) of this question. In the first link I showed how one can do this by artificially duplicating the data in a specific way using VARSTOCASES and then using SPLIT FILE to generate the separate charts. Here I will show a python based solution that does not require duplicating the data.

So first we will start off with a set of fake student scores, 20 students with 5 scores each.

*Create some fake data, student test scores.
SET SEED 10.
INPUT PROGRAM.
STRING Student (A1).
LOOP #i = 1 TO 5.
  LOOP #j = 1 TO 20.
    COMPUTE Student = STRING(#j+64,PIB).
    COMPUTE Score = RND(RV.NORMAL(100,10)).
    END CASE.
  END LOOP.
END LOOP.
END FILE.
END INPUT PROGRAM.
DATASET NAME Student_Scores.
FORMATS Score (F3.0).
EXECUTE.

Now the students are listed as strings, but here I am going to use AUTORECODE to automatically turn the strings into number variables, and more importantly for what follows create a set of value labels corresponding to those unique strings.

*Use Auto-recode to make the variables 1 to N.
AUTORECODE VARIABLES = Student /INTO Student_N.
FORMATS Student_N (F6.0).

Now the workflow I want to do is to make a set of charts with the background a boxplot for the whole class, and then the individual students scores as foreground dots. To do this I will make a second set of scores that are missing for everyone except that one particular student, the specify MISSING=VARIABLEWISE on the GGRAPH command, and then superimpose Score2 over the boxplot of Score.

*Example of Individual chart.
NUMERIC flag (F1.0) Score2 (F3.0).

DO IF Student_N = 1.
  COMPUTE Score2 = Score.
  COMPUTE flag = 1.
ELSE.
  COMPUTE Score2 = $SYSMIS.
  COMPUTE flag = 0.
END IF.

GGRAPH
  /GRAPHDATASET NAME="graphdataset" VARIABLES=Score Score2 flag MISSING = VARIABLEWISE
  /GRAPHSPEC SOURCE=INLINE.
BEGIN GPL
  SOURCE: s=userSource(id("graphdataset"))
  DATA: Score=col(source(s), name("Score"))
  DATA: Score2=col(source(s), name("Score2"))
  COORD: rect(dim(1), transpose())
  GUIDE: axis(dim(1), label("Score"))
  GUIDE: legend(aesthetic(aesthetic.visible), null())
  GUIDE: text.title(label("Student: A"))
  ELEMENT: schema(position(bin.quantile.letter(Score)), color.interior(color.grey))
  ELEMENT: point.dodge.symmetric(position(bin.dot(Score2)), color.interior(color.red))
END GPL.
*cleaing up temp variables.
MATCH FILES FILE = * /DROP flag Score2.

There are other ways to do this, like using the visible option in GPL aesthetics, but I don’t do that here because they still exist in the chart but simply aren’t shown. This causes problems with the dodging, and if you sent the chart in vector format the information would still be contained in the chart (e.g. if you need to aggregate the background data to be obfuscated for confidentiality reasons you don’t want it in the chart even if it is invisible). Here even the outlier dots in the boxplot are potentially disseminating confidential information, but for simplicity I don’t worry about that here (my syntax at the developerworks forum showed how you can build your own boxplot without having the points, it would be nice to have a no points option for the schema element).

So now the problem is looping through all of the individual students and generating a chart for each one. That is where the AUTORECODE comes in handy. I can grab all of the value labels from the SPSS dictionary and place them in a Python dictionary.

*Python to grab the different students.
BEGIN PROGRAM Python.
import spss
spss.StartDataStep()
datasetObj = spss.Dataset()
StudentLab = datasetObj.varlist['Student_N'].valueLabels
print StudentLab #this is a dictionary of all the unique students
spss.EndDataStep()
END PROGRAM.

Now with the StudentLab Python dictionary I can loop over the dictionary and submit the SPSS syntax for each unique student (using spss.Submit) using string substitutions. I first create the variables and set there formats outside of the loop (the chart inherits the formats). Then I just set several aesthetics of the charts so they are the same for every chart, e.g. the scale goes between 60 and 150, and the size of the superimposed points is 12.

*Now loop through the students.
OUTPUT CLOSE ALL.
BEGIN PROGRAM Python.
spss.Submit("NUMERIC flag (F1.0) Score2 (F3.0).")
for val, lab in StudentLab.data.iteritems():
  spss.Submit("""*Individual score chart.
DO IF Student_N = %d.
  COMPUTE Score2 = Score.
  COMPUTE flag = 1.
ELSE.
  COMPUTE Score2 = $SYSMIS.
  COMPUTE flag = 0.
END IF.
GGRAPH
  /GRAPHDATASET NAME="graphdataset" VARIABLES=Score Score2 flag MISSING = VARIABLEWISE
  /GRAPHSPEC SOURCE=INLINE.
BEGIN GPL
  SOURCE: s=userSource(id("graphdataset"))
  DATA: Score=col(source(s), name("Score"))
  DATA: Score2=col(source(s), name("Score2"))
  DATA: id=col(source(s), name("$CASENUM"), unit.category())
  DATA: flag=col(source(s), name("flag"), unit.category())
  COORD: rect(dim(1), transpose())
  GUIDE: axis(dim(1), label("Score"), delta(10), start(60))
  GUIDE: text.title(label("Student: %s"))
  GUIDE: legend(aesthetic(aesthetic.visible), null())
  SCALE: linear(dim(1), min(60), max(150))
  ELEMENT: schema(position(bin.quantile.letter(Score)), color.interior(color.grey))
  ELEMENT: point.dodge.symmetric(position(bin.dot(Score2)), color.interior(color.red),
           size(size."12"))
END GPL.
""" %(val,lab))
END PROGRAM.

I wanted to export these charts in the loop with the students names, using something like:

SpssOutputDoc.SelectLastOutput() #grab last output
SpssOutputDoc.ExportCharts(SpssClient.SpssExportSubset.SpssSelected, path + lab, SpssClient.ChartExportFormat.png)

but what happens with this is that it is always one behind (e.g. the first chart is selected in the second loop iteration). So what I did was to stuff all of the charts within a list and then loop over that list, select the chart, and then export it using SpssOutputDoc.ExportCharts (another option would be to use EXPORT OUTPUT and then either delete the output in-between charts or clear it, I wish OMS could export only charts). This would be more annoying with multiple individual charts, and could likely be made more concise, but here it is.

*Now exporting the individual charts.
BEGIN PROGRAM Python.
import SpssClient
SpssClient.StartClient()
SpssOutputDoc = SpssClient.GetDesignatedOutputDoc()

#creating a list of all the charts
OutputItems = SpssOutputDoc.GetOutputItems()
Charts = []
for index in range(OutputItems.Size()):
  OutputItem = OutputItems.GetItemAt(index)
  if OutputItem.GetType() == SpssClient.OutputItemType.CHART:
    Charts.append(OutputItem)

labList = []
for val, lab in StudentLab.data.iteritems():
  labList.append(lab)

path = "C:/Users/andrew.wheeler/Dropbox/Documents/BLOG/RepeatingCharts/"

for chart,lab in zip(Charts,labList):
  SpssOutputDoc.ClearSelection() #clear prior selections
  chart.SetSelected(True) #select chart
  #export chart
  SpssOutputDoc.ExportCharts(SpssClient.SpssExportSubset.SpssSelected, path + lab, SpssClient.ChartExportFormat.png)
END PROGRAM.

Here is a screen shot of the resulting images in my folder.

So this will export the charts to PNG format with the image name the same as the students in the file (so the name needs to be in a format appropriate to save a file name). Annoyingly SPSS appends 1 to the end of all charts, even if it is only exporting one chart. Here is an example of the student G’s chart.

Eventually I will figure out how to send emails via Python, and this would be a good tool for individualized report cards for a class. Here is a copy of the full syntax to more easily run on your local machine (just replace path with a location on your local machine).

Using the Google Distance API in SPSS – plus some EDA of travel time versus geographic distance

The other day I had a conversation with a colleague about calculating travel time distances and comparing them to actual geographic distances (aka as the crow flies). Being unfamiliar with the Network add-on in ArcGIS I figured I would take a stab at this task with the Google Distance API. Being lazy, I’m not going to explain the code, but in a nutshell works basically the same way as my prior code samples for the Google places API. The main difference is that this code will only return one result per record in the original file.

BEGIN PROGRAM Python.
import urllib, json

#This parses the returned json to pull out the distance in meters and
#duration in seconds, [None,None] is returned is status is not OK
def ExtJsonDist(place):
  if place['rows'][0]['elements'][0]['status'] == 'OK':
    meters = place['rows'][0]['elements'][0]['distance']['value']
    seconds = place['rows'][0]['elements'][0]['duration']['value']
  else:
    meters,seconds = None,None
  return [meters,seconds]

#Takes a set of lon-lat coordinates for origin and destination,
#plus your API key and returns the json from the distance API
def GoogDist(OriginX,OriginY,DestinationX,DestinationY,key):
  MyUrl = ('https://maps.googleapis.com/maps/api/distancematrix/json'
           '?origins=%s,%s'
           '&destinations=%s,%s'
           '&key=%s') % (OriginY,OriginX,DestinationY,DestinationX,key)
  response = urllib.urlopen(MyUrl)
  jsonRaw = response.read()
  jsonData = json.loads(jsonRaw)
  data = ExtJsonDist(jsonData)
  return data
END PROGRAM.

So because for each pair of origin and destinations this only returns one result, we can use this function in SPSSINC TRANS to return the distance in meters and the travel time in seconds without having to worry about any other data manipulations in python. The only additional item we need besides the origin and destination latitude and longitude are your Google API key in a seperate string variable. So if you had the OD coordinates in the fields Ox,Oy,Dx,Dy for origin longitude, origin latitude etc. the code would simply be:

STRING MyKey (A100).
COMPUTE MyKey = '!!!!!!!YOUR KEY HERE!!!!!!!!!!!!!'.
EXECUTE.

SPSSINC TRANS RESULT=Meters Seconds TYPE=0 0 
/FORMULA GoogDist(OriginX=Ox,OriginY=Oy,DestinationX=Dx,DestinationY=Dy,key=MyKey).

Note the Google distance API has a limit of 2,500 queries per day, and unlike the places API can not be upped by providing verification (unfortunately).

The context the colleague was asking was for a project about prison visitation, for some background see a report by Jacquelyn Greene at the New York State DCJS, and I saw recently Joshua Cochran plus a few other of the Florida State folks published a paper about prisoner visitation in Florida. So I figured a good test would be calculating the correlation between travel distance and geographic distances between all of the zip codes in New York State to one particular prison.

I chose to calculate the distances between the centroid of zip code areas and Attica State prison, which is in between Rochester and Buffalo in the westernmost part of New York state. FYI zip code areas are not well defined, so don’t ask me how exactly the ones I used here are calculated, but I got them from the New York State GIS clearinghouse, and they were from 2009.

So as long as you have the prior python function GoogDist defined, here is a set of brief syntax to grab the zip code data and calculate the travel time and travel distance. This does take a few minutes, but I never had a problem with the 100 queries per 1 minute suggestion by Google in my tests. Their are 2,332 zip code areas in New York State, so beware this about uses up your limit for the day (and you have no second chances)! This took me about 8 minutes to calculate.

*Grab the online data.
SPSSINC GETURI DATA
URI="https://dl.dropboxusercontent.com/u/3385251/NewYork_ZipCentroids.sav"
FILETYPE=SAV DATASET=NY_Zips.

*Travel distance to Attica.
COMPUTE Dx = -78.276205.
COMPUTE Dy = 42.850721.

STRING MyKey (A100).
COMPUTE MyKey = '!!!!!!!YOUR KEY HERE!!!!!!!!!!!!!'.
EXECUTE.

SPSSINC TRANS RESULT=Meters Seconds TYPE=0 0 
/FORMULA GoogDist(OriginX=LongCent,OriginY=LatCent,DestinationX=Dx,DestinationY=Dy,key=MyKey).

We can also calculate the euclidean "crows flies" distance via the extendedTransforms python code. This returns the distance miles, and so the following code converts the two distances to kilometers and the time to minutes.

*As the crow flies distance.
SPSSINC TRANS RESULT=MilesCrow TYPE=0
/FORMULA extendedTransforms.ellipseDist(lat1=LatCent,lon1=LongCent,lat2=Dy,lon2=Dx,inradians=False).

*Convert to meters. 
COMPUTE KMCrow = (MilesCrow*1609.34)/1000.
COMPUTE KMTrav = Meters/1000.
COMPUTE Minutes = Seconds/60.
FORMATS KMCrow KMTrav Minutes (F6.0).

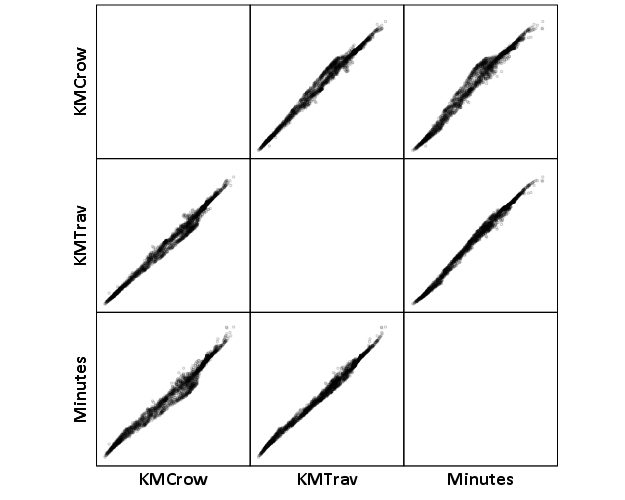
Now, part of my suggestion was actually that calculating travel times is not necessary, because they will be highly correlated with each other. Here is the scatterplot matrix of the three measures, travel distance, geographic distance, and travel time. The inter-item correlations are all around .99.

GGRAPH 
  /GRAPHDATASET NAME="graphdataset" VARIABLES=KMCrow KMTrav Minutes 
  /GRAPHSPEC SOURCE=INLINE. 
BEGIN GPL 
  SOURCE: s=userSource(id("graphdataset")) 
  DATA: KMCrow=col(source(s), name("KMCrow")) 
  DATA: KMTrav=col(source(s), name("KMTrav")) 
  DATA: Minutes=col(source(s), name("Minutes")) 
  GUIDE: axis(dim(1.1), ticks(null())) 
  GUIDE: axis(dim(2.1), ticks(null())) 
  GUIDE: axis(dim(1), gap(0px)) 
  GUIDE: axis(dim(2), gap(0px)) 
  TRANS: KMCrow_label = eval("KMCrow") 
  TRANS: KMTrav_label = eval("KMTrav") 
  TRANS: Minutes_label = eval("Minutes") 
  ELEMENT: point(position((KMCrow/KMCrow_label+KMTrav/KMTrav_label+Minutes/Minutes_label)*
                (KMCrow/KMCrow_label+KMTrav/KMTrav_label+Minutes/Minutes_label)),
                 size(size."2"), transparency.exterior(transparency."0.8"))  
END GPL.
CORRELATIONS VARIABLES= KMCrow KMTrav Minutes.

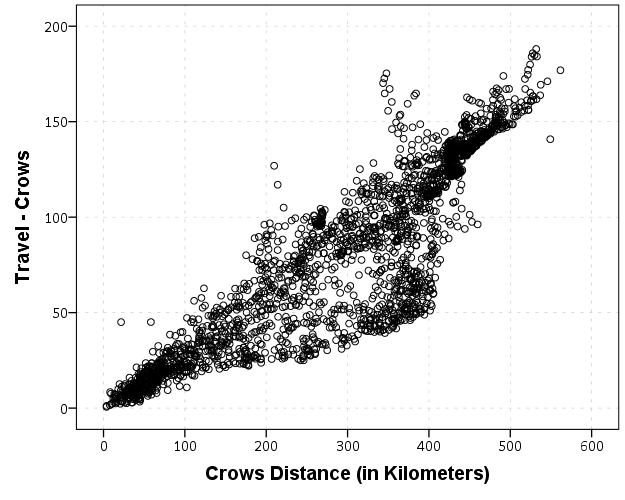
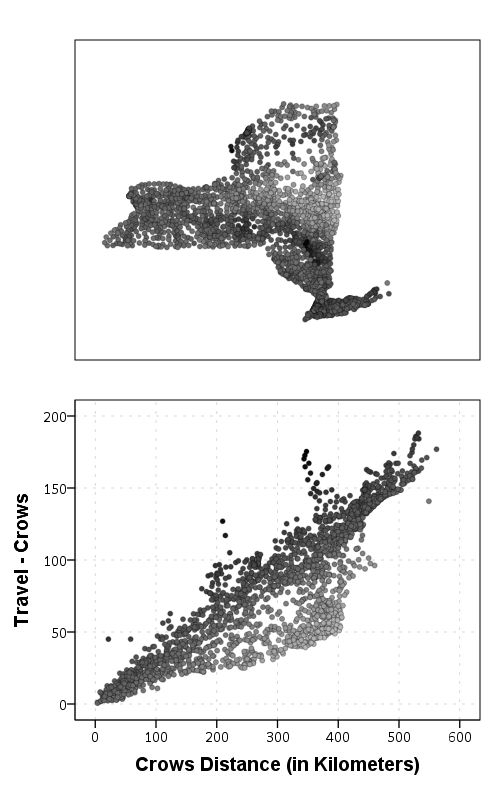
I expected that the error would get larger for larger travel and geographic distances, so to investigate this a simple graphical check is to estimate the difference between the two measures on the Y axis and the mean of the two measures on the X axis. Depending on who you ask, this is a Tukey mean difference plot or a Bland-Altman plot. Generally when comparing the scatterplot matrices it is easier to see the spread when you detilt the plot (using Tukey’s terminology), and calculating the differences is one way to do the detilting.

Here I calculate Dif = TravelDistance - GeoDistance, as I know the travel distance will always be larger than the geographic distance. For simplicity I just plot the geographic distance on the x axis instead of the mean of the two measures.

*Tukey mean difference chart.
GGRAPH
  /GRAPHDATASET NAME="graphdataset" VARIABLES=KMTrav KMCrow MISSING=LISTWISE REPORTMISSING=NO
  /GRAPHSPEC SOURCE=INLINE.
BEGIN GPL
  SOURCE: s=userSource(id("graphdataset"))
  DATA: KMTrav=col(source(s), name("KMTrav"))
  DATA: KMCrow=col(source(s), name("KMCrow"))
  TRANS: Dif = eval(KMTrav - KMCrow)
  GUIDE: axis(dim(2), label("Travel - Crows"))
  GUIDE: axis(dim(1), label("Crows Distance (in Kilometers)"))
  ELEMENT: point(position(KMCrow*Dif))
END GPL.

This shows three particular things:

  1. It appears to be a mostly mixture of two separate linear regressions
  2. Within each mixture the measurement error is close to a constant multiple of the geographic distance
  3. There are some outliers as fingers of large travel distances extending from the point cloud.

Some more EDA shows that the mixture is reflective of being close to Interstate 90 – those cities (like Albany and Syracuse) nearby the highway have a shorter travel time. Here what I did was estimate the linear regression for the prior plot and then color the residuals. Then I made a side-by-side set of the latitude-longitude coordinates next to the same scatterplot (colored). I can’t tell from this plot, but some of the high outliers appears in a cluster in downstate, maybe in the Catskills. But there are a few other of the high outliers shown around the state.

*Note this is the same as estimating regression on differences. 
*see http://stats.stackexchange.com/a/15759/1036. 
REGRESSION
  /MISSING LISTWISE
  /STATISTICS COEFF OUTS R ANOVA
  /CRITERIA=PIN(.05) POUT(.10)
  /NOORIGIN 
  /DEPENDENT KMTrav
  /METHOD=ENTER KMCrow
  /SAVE RESID(Resid1).

*Hmm, we have a mixture, lets see what explains that.
GGRAPH
  /GRAPHDATASET NAME="graphdataset" VARIABLES=LongCent LatCent Resid1 KMTrav KMCrow
    MISSING=LISTWISE REPORTMISSING=NO
  /GRAPHSPEC SOURCE=INLINE.
BEGIN GPL
  PAGE: begin(scale(500px,800px))
  SOURCE: s=userSource(id("graphdataset"))
  DATA: LongCent=col(source(s), name("LongCent"))
  DATA: LatCent=col(source(s), name("LatCent"))
  DATA: Resid1=col(source(s), name("Resid1"))
  DATA: KMTrav=col(source(s), name("KMTrav"))
  DATA: KMCrow=col(source(s), name("KMCrow"))
  TRANS: Dif = eval(KMTrav - KMCrow)
  GRAPH: begin(origin(15%, 5%), scale(81%, 40%))
  GUIDE: axis(dim(1), null())
  GUIDE: axis(dim(2), null())
  GUIDE: legend(aesthetic(aesthetic.color.interior), null())
  SCALE: linear(aesthetic(aesthetic.color), aestheticMinimum(color.lightgrey), aestheticMaximum(color.black))
  ELEMENT: point(position(LongCent*LatCent), color.interior(Resid1), size(size."5"), transparency.exterior(transparency."0.7"))
  GRAPH: end()
  GRAPH: begin(origin(15%, 50%), scale(81%, 40%))
  GUIDE: axis(dim(2), label("Travel - Crows"))
  GUIDE: axis(dim(1), label("Crows Distance (in Kilometers)"))
  GUIDE: legend(aesthetic(aesthetic.color.interior), null())
  SCALE: linear(aesthetic(aesthetic.color), aestheticMinimum(color.lightgrey), aestheticMaximum(color.black))
  ELEMENT: point(position(KMCrow*Dif), color.interior(Resid1), size(size."5"), transparency.exterior(transparency."0.7"))
  GRAPH: end()
  PAGE: end()
END GPL.

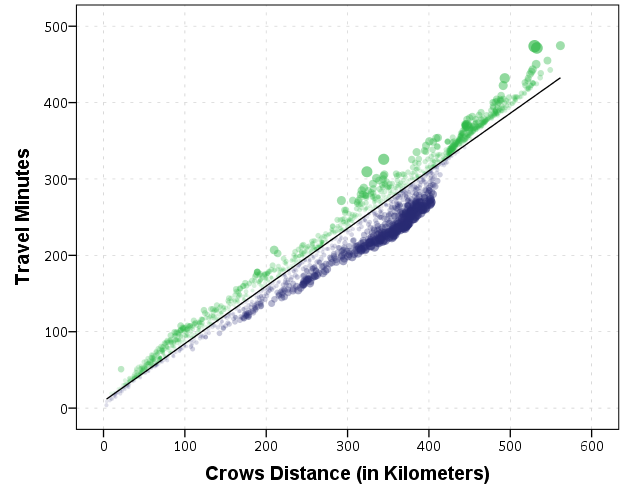
The linear regression gives a rough estimate for the relationship between travel distance and geographic distance in this sample that is about:

Travel Distance in = -4.7 + 1.3*Geographic Distance

A better model would include an interaction between distance to I-90 (and then maybe a term for being in the mountains), but again I am lazy! Obviously the negative intercept doesn’t make physical sense, so you really only want to use this for geographic distances of say 50 kilometers or larger, else it will likely be an underestimate. The opposite is true if you are close to I-90, this formula is likely to be an overestimate.

The same exercise for the travel time in minutes gives the equation Travel Time in Minutes = 9 + 0.75*(Geographic Distance in Kilometers):

*Minutes as a function of distance.
REGRESSION
  /MISSING LISTWISE
  /STATISTICS COEFF OUTS R ANOVA
  /CRITERIA=PIN(.05) POUT(.10)
  /NOORIGIN 
  /DEPENDENT Minutes
  /METHOD=ENTER KMCrow
  /SAVE RESID(MinResid).

COMPUTE AbsResid = ABS(MinResid).
COMPUTE DirResid = MinResid/AbsResid.

GGRAPH
  /GRAPHDATASET NAME="graphdataset" VARIABLES=Minutes KMCrow AbsResid DirResid
  /GRAPHSPEC SOURCE=INLINE.
BEGIN GPL
  SOURCE: s=userSource(id("graphdataset"))
  DATA: Minutes=col(source(s), name("Minutes"))
  DATA: KMCrow=col(source(s), name("KMCrow"))
  DATA: AbsResid=col(source(s), name("AbsResid"))
  DATA: DirResid=col(source(s), name("DirResid"), unit.category())
  TRANS: Dif = eval(KMTrav - KMCrow)
  GUIDE: axis(dim(2), label("Travel Minutes"))
  GUIDE: axis(dim(1), label("Crows Distance (in Kilometers)"))
  GUIDE: legend(aesthetic(aesthetic.color.interior), null())
  GUIDE: legend(aesthetic(aesthetic.transparency.interior), null())
  GUIDE: legend(aesthetic(aesthetic.size), null())
  SCALE: linear(aesthetic(aesthetic.size), aestheticMinimum(size."3"), aestheticMaximum(size."13"))
  SCALE: linear(aesthetic(aesthetic.transparency), aestheticMinimum(transparency."0.3"), aestheticMaximum(transparency."0.9"), reverse())
  ELEMENT: point(position(KMCrow*Minutes), color.interior(DirResid), transparency.interior(AbsResid),
                 size(AbsResid), transparency.exterior(transparency."1"))
  ELEMENT: line(position(smooth.linear(KMCrow*Minutes)))
END GPL.

Again the mixture appears, but the linear regression appears as a much closer fit between geographic distance and travel time.

So in both cases, at least in this sample, it appears it is not really necessary to calculate travel distance. One can make a pretty good guess as to the travel distance simply given the geographic distance. Or going the other way using Pennsylvania speak, if I say the distance between two locations is about 1 hour this would translate into about 68 kilometers (i.e. 42 miles).