
I’ve been doing quite a bit of stuff with gang networks lately at work. Networks are a total PIA though to create and do data manipulation on in traditional spreadsheets and statistic tools, so I figured I would blog about some of my attempts to ease the pain for fellow crime analysts.
First I will show how to create an edge list in Access from the way a traditional police RMS database is set up. Second I will show a trick about exploring people and gangs by creating a dynamic lookup in Excel. You can download the Access Database I used and the Excel spreadsheet here to follow along.
Making an Edge List in Access
I’ve previously shown how to make an edgelist in SPSS. I’ll cast the net wider and show how to do this in Access though.
In a nutshell, an edge list is a table of the form:
Person A, Person B
Person B, Person C
Person C, Person D
Where being in the same row shows some type of connection between the two persons, e.g. Person A is connected to Person B. In police databases the connections most often of interest are co-offending (e.g. two people were arrested for the same incident) or being stopped together (e.g. in the same car or during the same field interrogation).
Typically police databases will have a table that lists a common incident identifier, along with persons associated with that incident and their involvement. Here is a screen shot of the simple example I made in an Access Database to mimic this which I named IncidentPersons:
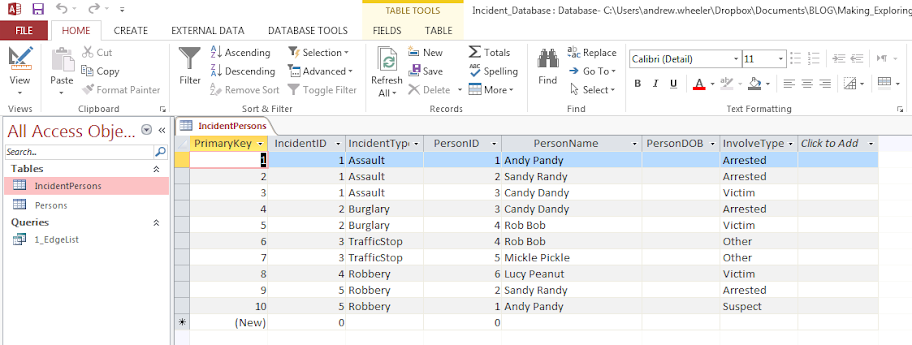
So here we can see that for incident 1, Andy Pandy, Sandy Randy, and Candy Dandy are all persons involved. Candy is the victim, and the other two were arrested. This table is always called something different for every PD’s RMS system, but some examples I have come across are crossref and person_exploded. All RMS’s I have seen though have some sort of table like this.
To make an edge list from this table takes some knowledge of SQL, but it can be done in one query. Basically we will be joining a table to itself, and selecting out distinct rows. Here is the most basic SQL query in Access to accomplish this.
SELECT DISTINCT F.PersonID, F.PersonName, S.PersonID, S.PersonName
FROM IncidentPersons AS F INNER JOIN IncidentPersons AS S ON F.IncidentID = S.IncidentID
WHERE F.PersonID < S.PersonID;
To walk through this, we make two table aliases from the same original IncidentPersons table, F and S. Then we do an INNER JOIN based on the original incident ID. If we stopped here without the last WHERE clase, what would happen is we would have pairs of people with themselves, and with duplicate ties of the form A -> B and B -> A. So selecting only instances in which F.PersonID < S.PersonID eliminates those self edges and duplicates. The last part here is SELECT DISTINCT instead of select. This will make it so any particular edge is only returned once. (If you deleted DISTINCT in this database, Andy Pandy -> Sandy Randy would be returned twice.)
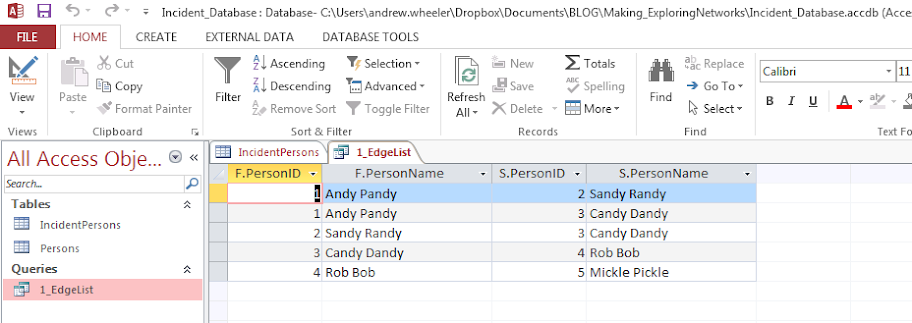
Running this query we then have:
In practice it will be more complicated because you will want to filter certain connections and add more info. on people into the final edge list. Here I ignore the involvement type, but you may want to only restrict matches to certain co-involvements (since offender-victim is of a different nature than co-offending). You also may want to not just know those connected, but count up the number of times those people are connected. For my work, I have always just limited to co-offending and being stopped together (and haven’t ever worried about the number of ties).
Also depending on how the database is normalized, often people names will change/have spelling errors, but they will still be linked to the same personid. These different spellings would cause the DISTINCT selection to not work as expected. A workaround is to only select based on the unique PersonID’s and not import other data, then in an additoional query merge in the person data. For gang network analysis you will likely want to merge in gang affiliation (which will probably be in a seperate table, not in the RMS). If you are still following along though you can figure that stuff out on your own.
Making an Edge Lookup Table in Excel
So now that I have shown how to make the edge table, what to do with it now? (No excuses – since I gave examples in both SPSS and SQL!) Here I will show a simple trick to explore the network using filtering in Excel.
The edge list itself is often the needed format to import into other network based software. So you can make a nice network graph using Gephi or whatever. The graph is good to see the overall form of the network when the graph is limited to only a few nodes, but they are typically really complicated, and tools like Gephi aren’t very good for drilling down into specific people. Here I will show my simple drilldown solution using Excel.
The network I use for this example is entirely made up; it was simulated using NetworkX (python), names are random based on some internet lists of popular baby names and last names I forgot the source of already, and Date of births are random between 1975 and 1997. I also made up a list of 7 gangs (but people have a 9/16 chance to be assigned to no gang).
So starting with an edgelist, here is a screenshot of my made up edge list excel table.
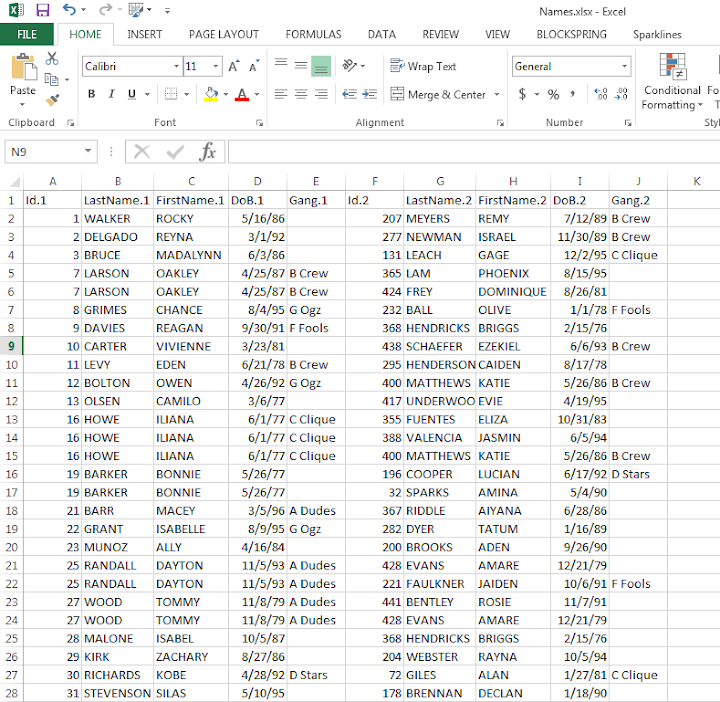
The problem in this format is if I filter the Id.1 column for 19 (BONNIE BARKER), they could potentially be in the Id.2 column as well, so I potentially miss edges. A simple solution to this is just to duplicate the data, but switch the order of the edges. Then when I filter by Id = 19, I will get all possible Bonnie Barker edges.
For a simple example of how to do this on a small table, if you start with:
17,19
18,19
19,20
19,21
If you filter the first column by 19, you will eliminate the 19’s in the second column. So just make a new table that has the ID’s reversed:
19,17
19,18
20,19
21,19
And then stack the two tables on top of one another
17,19 |
18,19 |  Table 1
19,20 |
19,21 |
19,17 +
19,18 +  Table 2
20,19 +
21,19 +
So now if you filter the first column by 19 you get 19’s all four connections. This is just three copy-pastes in excel to go from the original edge list to this table.
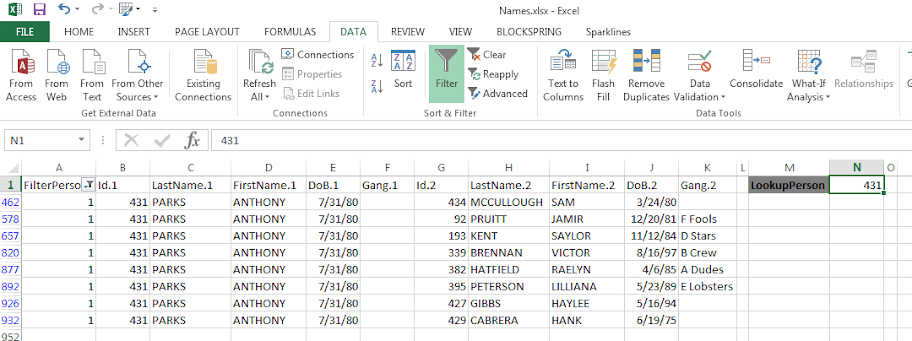
Now we can make a filter that dynamically changes based on user input. Here I make a selection in the top row, in N2 you can put in a persons ID. Then in A2, the formula is =IF(B2=$N$1,1,0). You can then paste this formula down, and it always references cell N2 because of the absolute $ modifiers.
Here is a screenshot of my example LookupTable in excel filtering for person 431.
If you update the personid in N1, then hit the reapply button in the toolbar (or hit Ctrl+Alt+L) to update the filter. Here I updated to be person 382.
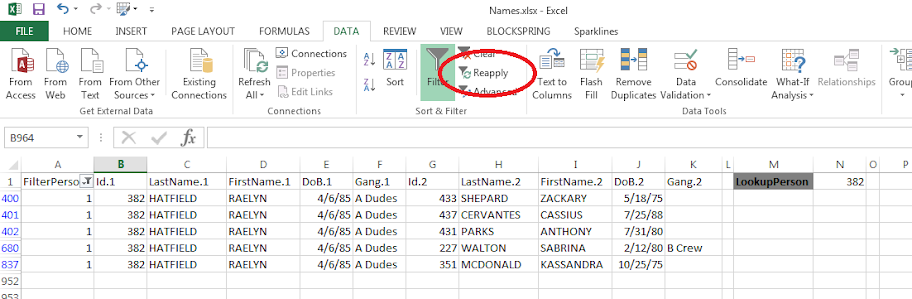
The context of why I created this example was to identify people that were connected to gang members, but themselves were not in the gang. Basically have a list to take to officers and say, are you sure this person is not an actual member of the gang? The spreadsheet is then a tool if I have a meeting, where someone can say, who is Raelyn Hatfield connected to? I can easily update the id and filter.
You can do this drill down in the original edge table if you have the IF condition look in both the first and second id column, but I do this because it is easier to see who a person is connected to. You only have to look in one column – you don’t have to scan back and forth between two columns to see the connections.
You can also do other aggregations on this table as well. For instance if you aggregate using a pivot table and count the number of instances it is the edge centrality of a person (i.e. the number of different people a person is connected to).
If you want to do a drilldown of specific gangs you could use the same logic and build another filter column, but this will duplicate people when they are connected to another person in the same gang. That would be an instance where it might be easier to use just the original edge table.

