Cyclical color ramps for time series line plots

Morphet & Symanzik (2010) propose different novel cyclical color ramps by taking ColorBrewer ramps and wrapping them on the circle. All other previous continuous circle ramps I had seen prior were always rainbow scales, and there is plenty discussion about why rainbow color scales are bad so we needn’t rehash that here (see Kosara, Drew Skau, and my favorite Why Should Engineers and Scientists Be Worried About Color? for a sampling of critiques).

Below is a picture of the wrapped cyclical ramps from Morphet & Symanzik (2010). Although how they "average" the end points is not real clear to me from reading the paper, they basically use a diverging ramp and have one end merge at a fully saturated end of the sprectrum (e.g. nearly black) and the other merge at the fully light end of the spectrum (e.g. nearly white).

The original motivation is for directional data, and here is a figure from my paper Viz. JTC lines comparing the original rainbow color ramp I chose (on the right) and an updated red-grey cyclical scale on the left. The map is still quite complicated, as part of the motivation of that map was to show how plotting the JTC the longer lines dominate the graphic.

But I was interested in applying this logic to showing cyclical line plots, e.g. aoristic crime estimates by hour of day and day of week. Using the same Arlington data I used before, here are the aoristic estimates for hour of day plotted seperately for each day of the week. The colors for the day of the week use SPSS’s default color scheme for nominal categories. SPSS does not have anything as far as color defaults to distinguish between ordinal data, so if you use a categorical coloring scheme this is what you get.

The default is very good to distinguish between nominal categories, but here I want to take advantage of the cyclical nature of the data, so I employ a cyclical color ramp.

From this it is immediately apparent that the percentage of crimes dips down during the daytime for the grey Saturday and Sunday aoristic estimates. Most burglaries happen during the day, and so you can see that when homeowners are more likely to be in the house (as oppossed to at work) burglaries are less likely to occur. Besides this, day of week seems largely irrelevant to the percentage of burglaries that are occurring in Arlington.

I chose to make during the week shades of red, the dark color split between Friday-Saturday, and the light color split between Sunday-Monday. This trades one problem for another, in that the more fully saturated colors draw more attention in the plot, but I believe it is a worthwhile sacrifice in this instance. Below are the Hexidecimal RGB codes I used for each day of the week.

Sun - BABABA
Mon - FDDBC7
Tue - F4A582
Wed - D6604D
Thu - 7F0103
Fri - 3F0001
Sat - 878787

How art can influence info viz.

The role of art on info viz. is a tortuous topic. Frequently, renditions of infographics have clear functional shortcomings as tools to convey quantitative data, but are lauded as beautiful pieces of art in spite of this. Thus the topic gets presented in overtones of function versus aesthetic, and any scientist worried about function would surely not choose something pretty over something obviously more functional (however you define functional). Thus the topic itself has some negative contextual history that impedes its discussion. But this is a false dichotomy; beauty need not impede function.

Here I want to bring to light some examples of how art actually has positive influences on the function of information visualization. I will break up the examples into two topics: the use of color and the rendering of graphics.

Color

The use of color to visualize discrete items in information visualizations is perhaps the most regular, but one of the most arbitrary decisions a designer makes. Here I will point to the work of Sidonie Christophe, who embraces the arbitrariness of using a color palette and uses popular pieces of artwork to create aesthetically pleasing color choices. Christophe makes the presumption that the colors in popular pieces of art provide ample contrast in the colors to effectively visualize different attributes, but are publicly vouched as aesthetically beautiful. Here is an example using a palette from one of Van Gogh’s paintings to apply to a street map (taken from Sidonie’s dissertation);

I won’t make any argument for Van Gogh’s palatte being more functional than other potential ones, but it is better than being guided by nothing (Van Gogh does have the added benefit of being color blind safe.)

Rendering

One example of artistic rendering of information I previously talked about was the logic behind the likability of XKCD graphs. There the motivation is both memorability of graphs and data reduction/simplification. Despite the minimalist straw man often painted of Tufte, in his later books he provides a variety of examples of diagrams that are artistic embellishments (e.g. the cover of Leviathan) but takes them as positive inspiration for GUI design.

Another recent example I came across is the use of curved lines in network diagrams (I have related academics interest in this for visualizing geographic flow data) which have motivation based on the work of Mark Lombardi.

The reason curved lines look nicer is not entirely aesthetic, it has functional values for displacing overlapping lines and (related) making in-bound edges easier to distinguish.

Much ado is made about network layout algorithms, but some interesting work is being done on visualizing the lines themselves. Interesting applications that are often lauded as beautiful are Circos and Hive Plots. Even Ben Shneiderman, creator of the treemap graphic, is getting in on the graphs as art wave.

I’m sure many other examples exist, so feel free to let me know in the comments.

Hanging rootograms and viz. differences in time series

These two quick charting tips are based on the notion that comparing differences from a straight line are easier than comparing deviations from a curved line. The problems with comparing differences between curved lines are similar to the difference between comparings length and distance from a common baseline (so Cleveland’s work is applicable), but the task of comparing two curves comes up enough that it deserves some specific attention.

The first example is comparing differences between a histogram and an estimated distribution. For example, people often like to superimpose a distribution curve on a histogram, and here is an example SPSS chart.

I believe it was Tukey who suggested that instead of plotting the histogram bars at the zero upwards, you hang them from the expected value. What this does is that instead of comparing differences from a curved line, you are comparing differences to the straight reference line at zero.

Although it is usual to plot the bars to cover the entire bin, I sometimes find this distracting. So here is an alternative (in SPSS – with example code linked to at the end of the post) in which I only plot lines and dots and just note in text the bin widths are in-between the hash marks on the X axis.

The second example is taken from William Playfair’s atlas, and Cleveland uses it to show that comparing two curves can be misleading. (It took me forever to find this data already digitized, so thanks for the bissantz blog for posting it.)

Instead of comparing the two curves only in terms of vertical deviations from one another, we tend to compare the curves in terms of the nearest location. Here the visual error in the magnitude of differences is likely to occur in the area between 1760 and 1766, where they look very close to one another because of the upward slope for both time series in that period.

Here I like the default behavior of SPSS when plotting the differences as an interval element and it is easier to see this potential error (just compare the length of the bars). When using a continuous scale, SPSS plots the interval elements with zero area inside and only an exterior outline (which ends up being near equivalent to a edge element).

More frequently though, people suggest just to plot the differences, and here is a chart with all three (Imports, Exports and the difference) plotted on the same graph. Note the differences at 1763 (390) is actually larger than the difference and the start of the series, 280 at 1700.

You can do similar things to scatterplots, which Tukey calls detilting plots. Again, the lesson is it is easier to compare differences from a straight line than it is differences from a curve (or sloped line). Here I have posted the SPSS code to make the graphs (I slightly cheated though and post edited in the guidelines and labels in the graph editor).

Using circular dot plots instead of circular histograms

Although as I mentioned in this post on circular helio bar charts, polar coordinates are unlikely to be as effective as rectilinear coordinates for most types of comparisons, I really wanted to use a circular histogram in a recent paper of mine. The motivation is I have circular data in form of azimuths (Journey to Crime), aggregated to quadrants. So I really wanted to use a small multiple plot of circular histograms with the visual connection to the actual direction the azimuths were distributed within each quadrant.

Part of the problem with circular histograms though is that the area near the center of the plot shrinks to nothing.

So a simple solution is to offset the center of the plot, so the bars don’t start at the origin, but a prespecified distance away from the center of the circle. Below is the same chart previously with a slight offset. (I saw this idea originally in Wilkinson’s Grammar of Graphics.)

And here is that technique extended to an example small multiple histogram from an earlier draft of the paper I previously mentioned.

Even with the offset, the problem of the shrinking area is even worse because of the many plots, and the outlying bars in one plot shrinks the rest of the distribution even more dramatically. So, even with the offsetting it is still quite difficult assess trends. Also note I don’t even bother to draw the radius guide lines. I noticed in some recent papers about analyzing circular data that they don’t draw bars for circular histograms, but use dots (and/or kernel density estimates). See examples in Brunsdon and Corcoran (2006), Ashby and Bowers (2013), and Russell and Levitin (1995). The below image is taken from Ashby and Bowers (2013) to demonstrate this.

The idea behind this is that, in polar coordinates, you need to measure the length of the bar, instead of distance from a common reference line. When you use dots, it is pretty trivial to just count the dots to see how far they stack up (so no axis guide is needed). This just replaces one problem for other ones, especially for larger sample sizes (in which you will need to discretize how many observations a point represents) but I don’t think it is any worse than bars at least in this situation (and can potentially be better for a smaller number of dots). One thing that does happen with points is that large stacks deviate from each other the further they grow towards the circumference of the polar coordinate system (the bars in histograms typically get wider). This just looks aesthetically bad, although the bars growing wider could be considered a disingenuous representation (e.g. Florence Nightingale’s coxcomb chart) (Brasseur, 2005; Friendly, 2008).

Unfortunately, SPSS’s routine to stack the dots in polar coordinates is off just slightly (I have full code linked at the end of the post to recreate some of the graphs in the post and display this behavior).

With alittle data manipulation though you can basically roll your own (although this is fixed bins, unlike irregular ones chosen based on the data like in Wilkinson’s dot plots, e.g. bin.dot in GPL) (Wilkinson, 1999).

And here is the same example small multiple histogram using the dots.

Here I have posted the code to demonstrate some of the graphs here (and I have the full code for the Viz. JTC paper here). To make the circular dot plot I use the sequential case processing trick, and then show how to use TRANS statements in inline GPL to adjust the positioning of the dots and if you want the dots to represent multiple values.


References

Some discussion on circular helio bar charts

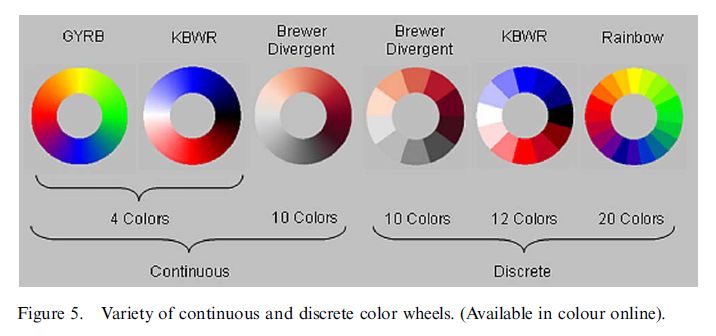
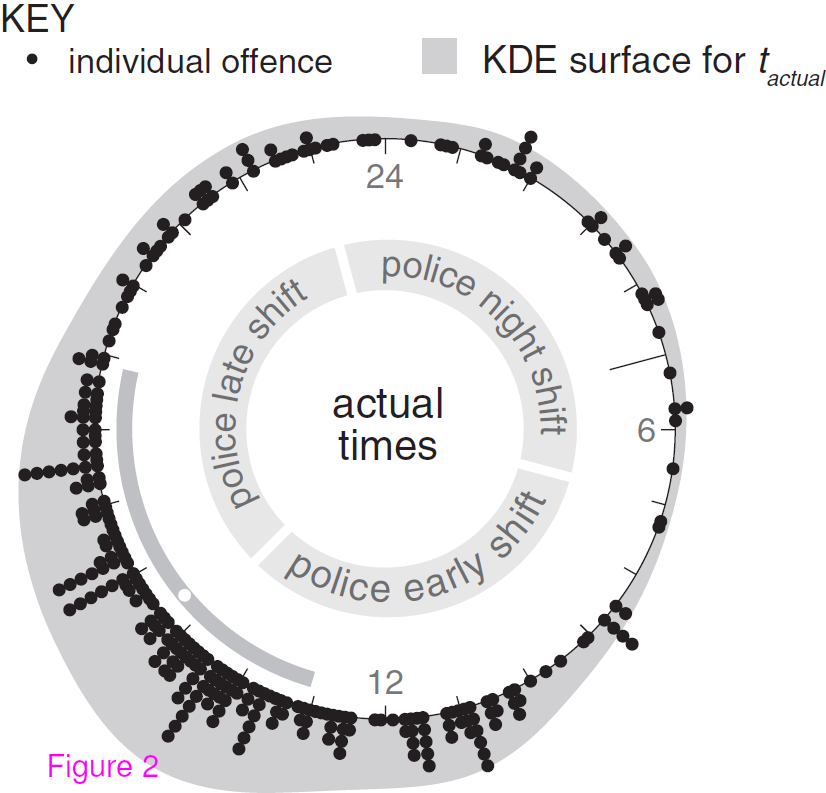
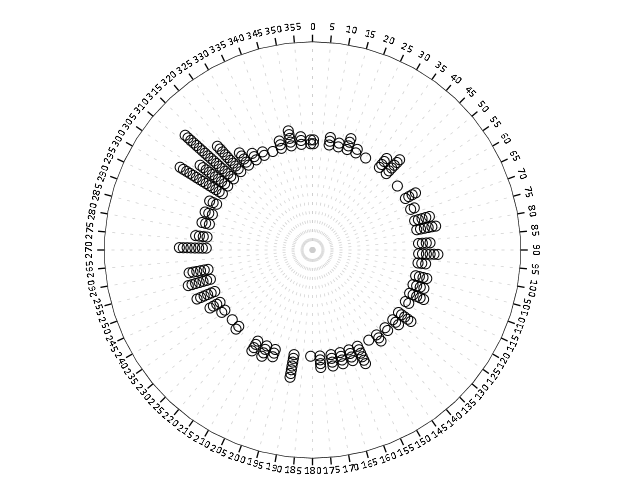
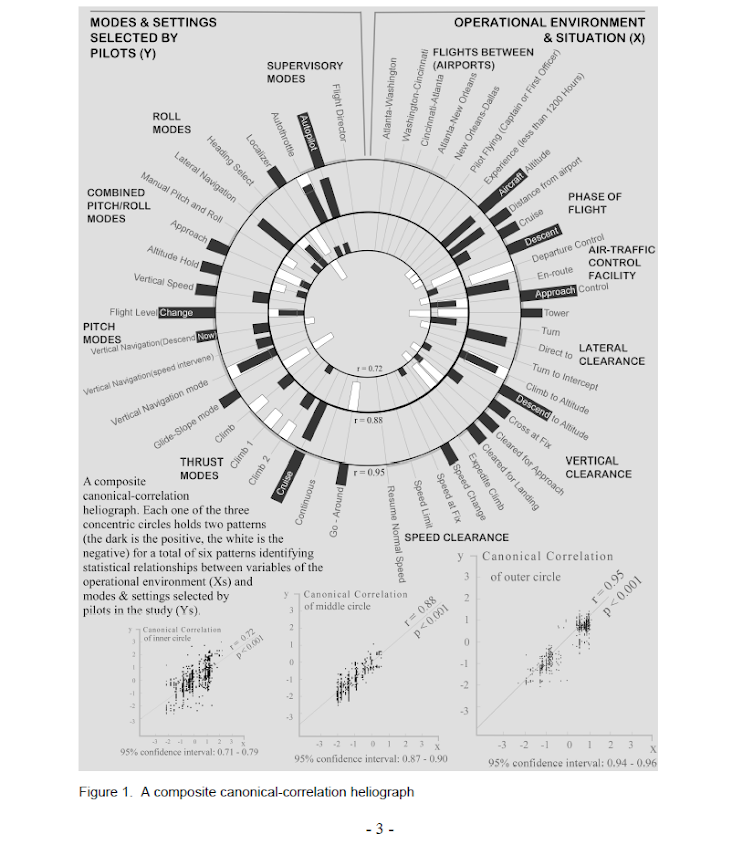
The other day I saw a popular post on the mathematica site was to reconstruct helio plots. They are essentially bar charts of canonical correlation coefficients plotted in polar coordinates, and below is the most grandiose example of them I could find (Degani et al., 2006).

That is a bit of a crazy example, but it is essentially several layers of bar charts in polar coordinates, with seperate rings displaying seperate correlation coefficients. Seeing there use in action struck me as odd, given typical perceptual problems known with using polar coordinates. Polar coordinates are popular for their space saving capabilities for network diagrams (see for example Circos) but there appears to be no redeeming quality of using polar coordinates for displaying the data in these circumstances that I can tell. The Degani paper gives the motivation for the polar coordinates because polar coordinates lack natural ordering that plots in cartesian coordinates imply. This strikes me as either unfounded or hypocritical, so I don’t really see why that is a reasonable motivation.

Polar coordinates have the negatives here that points going towards the center of the circle are compressed in smaller areas, and points going towards the edge of the circle are spread further apart. This creates a visual bias that does not portray actual data. I also presume length judgements in polar coordinates are more difficult. This having some bars protruding closer to one another and some diverging farther away I suspect cause more error judgements in false associations than do any ordering in bar charts in rectilinear coordinates. Also polar coordinates are very difficult to portray radial axis labels, so specific quantitative assements (e.g. this correlation is .5 and this correlation is .3) are difficult to make.

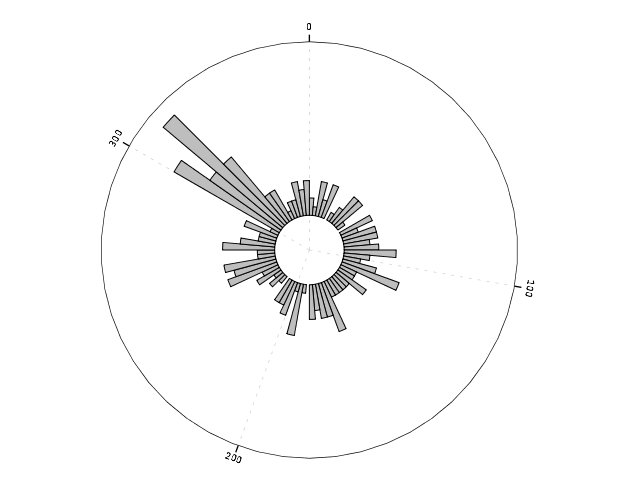
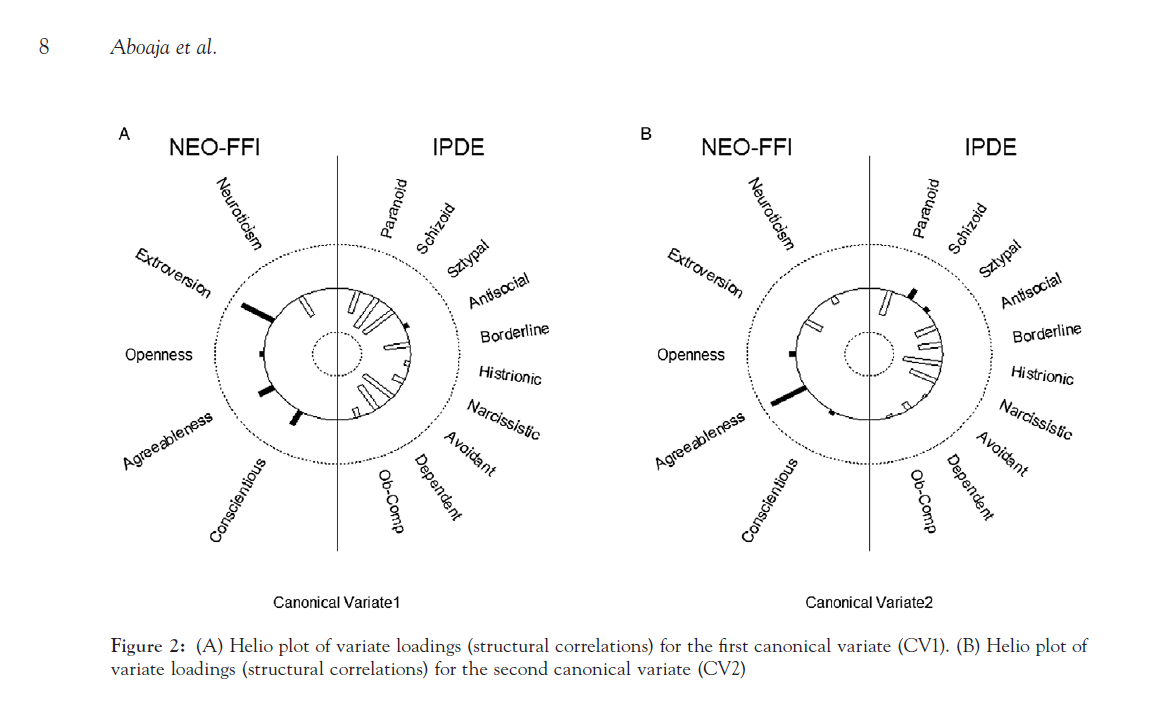
Below I will show an example taken from page 8 of Aboaja et al. (2011). Below is a screen shot of their helio plot, produced with the R package yacca.

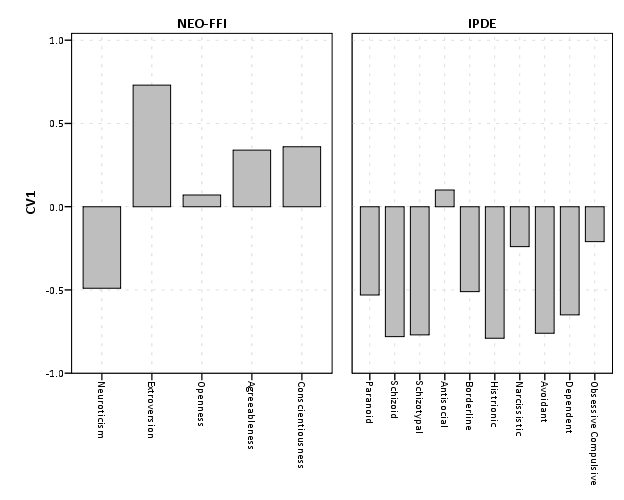
So first, lets not go crazy and just see how a simple bar chart suffices to show the data. I use nesting here to differentiate between NEO-FFI and IPDE factors, but one could use other aesthetics like color or pattern to clearly distinguish between the two.


data list free / type (F1.0) factors (F2.0) CV1 CV2.
begin data
1 1 -0.49 -0.17
1 2 0.73 -0.37
1 3 0.07 0.14
1 4 0.34 0.80
1 5 0.36 0.08
2 6 -0.53 -0.57
2 7 -0.78 0.25
2 8 -0.77 0.08
2 9 0.10 -0.45
2 10 -0.51 -0.48
2 11 -0.79 -0.48
2 12 -0.24 -0.56
2 13 -0.76 -0.04
2 14 -0.65 -0.16
2 15 -0.21 -0.05
end data.
value labels type
1 'NEO-FFI'
2 'IPDE'.
value labels factors
1 'Neuroticism'
2 'Extroversion'
3 'Openness'
4 'Agreeableness'
5 'Conscientiousness'
6 'Paranoid'
7 'Schizoid'
8 'Schizotypal'
9 'Antisocial'
10 'Borderline'
11 'Histrionic'
12 'Narcissistic'
13 'Avoidant'
14 'Dependent'
15 'Obsessive Compulsive'.
formats CV1 CV2 (F2.1).

*Bar Chart.
GGRAPH
  /GRAPHDATASET NAME="graphdataset" VARIABLES=factors CV1 type
  /GRAPHSPEC SOURCE=INLINE.
BEGIN GPL
 SOURCE: s=userSource(id("graphdataset"))
 DATA: factors=col(source(s), name("factors"), unit.category())
 DATA: type=col(source(s), name("type"), unit.category())
 DATA: CV1=col(source(s), name("CV1"))
 GUIDE: axis(dim(1), opposite())
 GUIDE: axis(dim(2), label("CV1"))
 SCALE: cat(dim(1.1), include("1", "2", "3", "4", "5", "6", "7", "8", "9", "10", "11", "12", "13", "14", "15"))
 SCALE: linear(dim(2), min(-1), max(1))
 ELEMENT: interval(position(factors/type*CV1), shape.interior(shape.square))
END GPL.

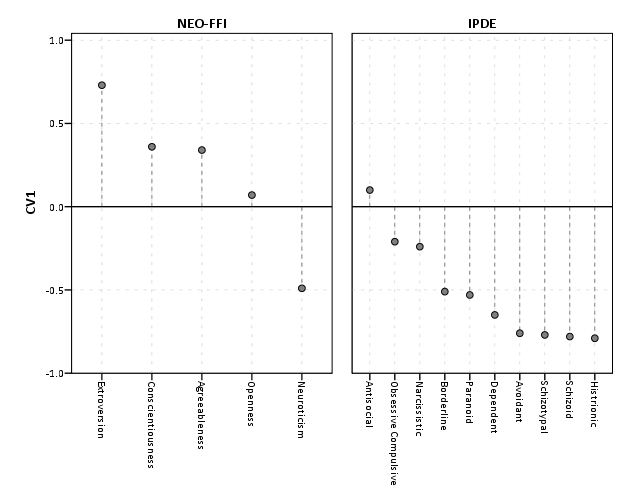
This shows an example of using nesting for the faceting structure in SPSS. The default behavior for SPSS is that the NEO-FFI has fewer categories, so the bars are plotted wider (because the panels are set to be equally sized). Wilkinson’s Grammar has examples of setting the panels to be different sizes just in this situation, but I do not believe this is possible in SPSS. Because of this, I like to use point and edge elements to just symbolize lines, which makes the panels visually similar. Also I post-hoc added a guideline at the zero value and sorted the values of CV1 descendingly within panels.


*Because of different sizes - I like the line with dotted interval.
GGRAPH
  /GRAPHDATASET NAME="graphdataset" VARIABLES=factors CV1 type
  /GRAPHSPEC SOURCE=INLINE.
BEGIN GPL
 SOURCE: s=userSource(id("graphdataset"))
 DATA: factors=col(source(s), name("factors"), unit.category())
 DATA: type=col(source(s), name("type"), unit.category())
 DATA: CV1=col(source(s), name("CV1"))
 TRANS: base=eval(0)
 GUIDE: axis(dim(1), opposite())
 GUIDE: axis(dim(2), label("CV1"))
 SCALE: cat(dim(1.1), include("1", "2", "3", "4", "5", "6", "7", "8", "9", "10", "11", "12", "13", "14", "15"), sort.statistic(summary.max(CV1)), reverse())
 SCALE: linear(dim(2), min(-1), max(1))
 ELEMENT: edge(position(factors/type*(base+CV1)), shape.interior(shape.dash), color(color.grey))
 ELEMENT: point(position(factors/type*CV1), shape.interior(shape.circle), color.interior(color.grey))
END GPL.

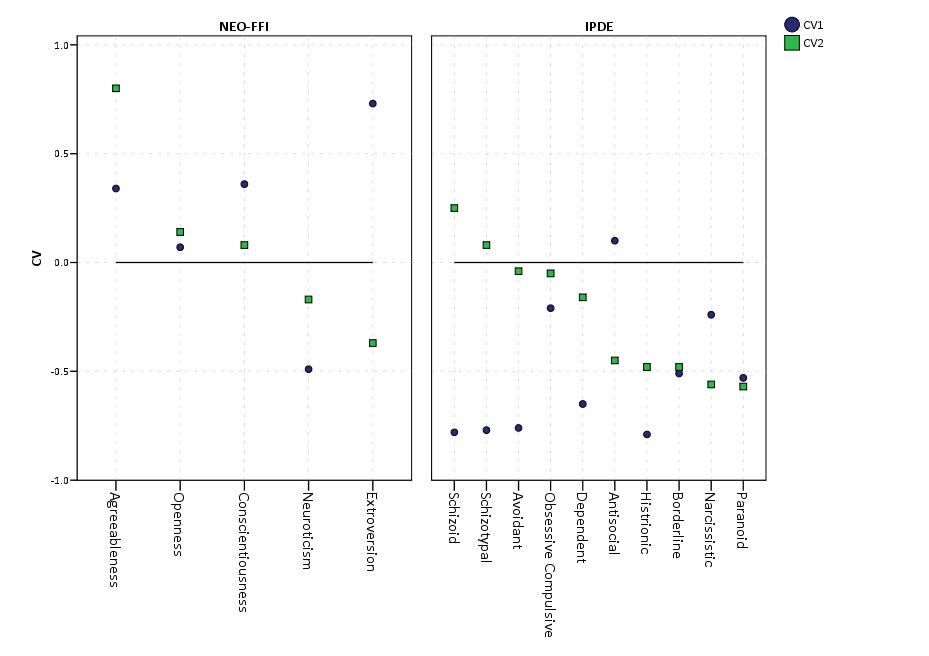
If one wanted to show both variates within the same plot, one could either use panels (as did the original Aboaja article, just in polar coordinates) or one could superimpose those estimates on the same plot. An example of superimposing is given below. This superimposing also extends to more than two canonical variates, although the more points the more the graph gets so busy it is difficult to interpret and one might want to consider small multiples. Here I show superimposing CV1 and CV2 and sort by descending values of CV2.


GGRAPH
  /GRAPHDATASET NAME="graphdataset" VARIABLES=factors CV1 CV2 type
  /GRAPHSPEC SOURCE=INLINE.
BEGIN GPL
 SOURCE: s=userSource(id("graphdataset"))
 DATA: factors=col(source(s), name("factors"), unit.category())
 DATA: type=col(source(s), name("type"), unit.category())
 DATA: CV1=col(source(s), name("CV1"))
 DATA: CV2=col(source(s), name("CV2"))
 TRANS: base=eval(0)
 GUIDE: axis(dim(1), opposite())
 GUIDE: axis(dim(2), label("CV"))
 SCALE: cat(dim(1.1), include("1", "2", "3", "4", "5", "6", "7", "8", "9", "10", "11", "12", "13", "14", "15"), sort.statistic(summary.max(CV2)), reverse())
 SCALE: linear(dim(2), min(-1), max(1))
 ELEMENT: line(position(factors/type*base), color(color.black))
 ELEMENT: point(position(factors/type*CV1), shape.interior("CV1"), color.interior("CV1"))
 ELEMENT: point(position(factors/type*CV2), shape.interior("CV2"), color.interior("CV2"))
END GPL.

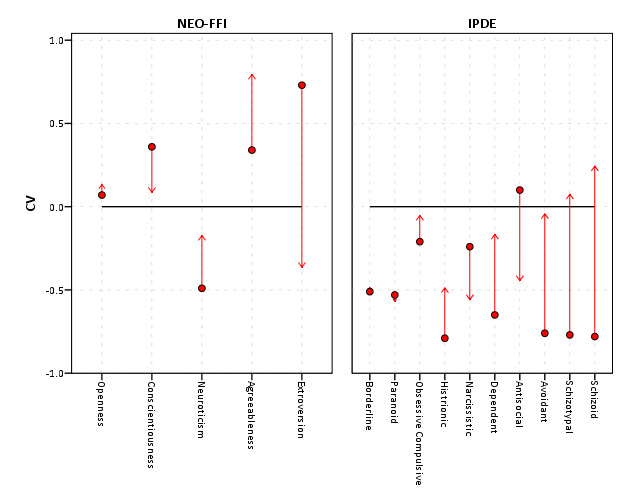
Now, I know nothing of canonical correlation, but if one wanted to show the change from the first to second canonical covariate one could use the edge element with an arrow. One could also order the axis here, based on values of either the first or second canonical variate, or on the change between variates. Here I sort ascendingly by the absolute value in the change between variates.


GGRAPH
  /GRAPHDATASET NAME="graphdataset" VARIABLES=factors CV1 CV2 type
  /GRAPHSPEC SOURCE=INLINE.
BEGIN GPL
 SOURCE: s=userSource(id("graphdataset"))
 DATA: factors=col(source(s), name("factors"), unit.category())
 DATA: type=col(source(s), name("type"), unit.category())
 DATA: CV1=col(source(s), name("CV1"))
 DATA: CV2=col(source(s), name("CV2"))
 TRANS: base=eval(0)
 GUIDE: axis(dim(1), opposite())
 GUIDE: axis(dim(2), label("CV"))
 SCALE: cat(dim(1.1), include("1", "2", "3", "4", "5", "6", "7", "8", "9", "10", "11", "12", "13", "14", "15"), sort.statistic(summary.max(diff)))
 SCALE: linear(dim(2), min(-1), max(1))
 ELEMENT: line(position(factors/type*base), color(color.black))
 ELEMENT: edge(position(factors/type*(CV1+CV2)), shape.interior(shape.arrow), color.interior(color.red)) 
 ELEMENT: point(position(factors/type*CV1), shape.interior(shape.circle), color.interior(color.red))
END GPL.

I’ve posted some additional code at the end of the blog post to show the nuts and bolts of making a similar chart in polar coordinates, plus a few other potential variants like a clustered bar chart. I see little reason though to prefer them to more traditional bar charts in a rectilinear coordinate system.


Citations


***********************************************************************************.
*Full code snippet.
data list free / type (F1.0) factors (F2.0) CV1 CV2.
begin data
1 1 -0.49 -0.17
1 2 0.73 -0.37
1 3 0.07 0.14
1 4 0.34 0.80
1 5 0.36 0.08
2 6 -0.53 -0.57
2 7 -0.78 0.25
2 8 -0.77 0.08
2 9 0.10 -0.45
2 10 -0.51 -0.48
2 11 -0.79 -0.48
2 12 -0.24 -0.56
2 13 -0.76 -0.04
2 14 -0.65 -0.16
2 15 -0.21 -0.05
end data.
value labels type
1 'NEO-FFI'
2 'IPDE'.
value labels factors
1 'Neuroticism'
2 'Extroversion'
3 'Openness'
4 'Agreeableness'
5 'Conscientiousness'
6 'Paranoid'
7 'Schizoid'
8 'Schizotypal'
9 'Antisocial'
10 'Borderline'
11 'Histrionic'
12 'Narcissistic'
13 'Avoidant'
14 'Dependent'
15 'Obsessive Compulsive'.
formats CV1 CV2 (F2.1).

*Bar Chart.
GGRAPH
  /GRAPHDATASET NAME="graphdataset" VARIABLES=factors CV1 type
  /GRAPHSPEC SOURCE=INLINE.
BEGIN GPL
 SOURCE: s=userSource(id("graphdataset"))
 DATA: factors=col(source(s), name("factors"), unit.category())
 DATA: type=col(source(s), name("type"), unit.category())
 DATA: CV1=col(source(s), name("CV1"))
 GUIDE: axis(dim(1), opposite())
 GUIDE: axis(dim(2), label("CV1"))
 SCALE: cat(dim(1.1), include("1", "2", "3", "4", "5", "6", "7", "8", "9", "10", "11", "12", "13", "14", "15"))
 SCALE: linear(dim(2), min(-1), max(1))
 ELEMENT: interval(position(factors/type*CV1), shape.interior(shape.square))
END GPL.

*Because of different sizes - I like the line with dotted interval.
GGRAPH
  /GRAPHDATASET NAME="graphdataset" VARIABLES=factors CV1 type
  /GRAPHSPEC SOURCE=INLINE.
BEGIN GPL
 SOURCE: s=userSource(id("graphdataset"))
 DATA: factors=col(source(s), name("factors"), unit.category())
 DATA: type=col(source(s), name("type"), unit.category())
 DATA: CV1=col(source(s), name("CV1"))
 TRANS: base=eval(0)
 GUIDE: axis(dim(1), opposite())
 GUIDE: axis(dim(2), label("CV1"))
 SCALE: cat(dim(1.1), include("1", "2", "3", "4", "5", "6", "7", "8", "9", "10", "11", "12", "13", "14", "15"), sort.statistic(summary.max(CV1)), reverse())
 SCALE: linear(dim(2), min(-1), max(1))
 ELEMENT: edge(position(factors/type*(base+CV1)), shape.interior(shape.dash), color(color.grey))
 ELEMENT: point(position(factors/type*CV1), shape.interior(shape.circle), color.interior(color.grey))
END GPL.

*Dot Plot Showing Both.
GGRAPH
  /GRAPHDATASET NAME="graphdataset" VARIABLES=factors CV1 CV2 type
  /GRAPHSPEC SOURCE=INLINE.
BEGIN GPL
 SOURCE: s=userSource(id("graphdataset"))
 DATA: factors=col(source(s), name("factors"), unit.category())
 DATA: type=col(source(s), name("type"), unit.category())
 DATA: CV1=col(source(s), name("CV1"))
 DATA: CV2=col(source(s), name("CV2"))
 TRANS: base=eval(0)
 GUIDE: axis(dim(1), opposite())
 GUIDE: axis(dim(2), label("CV"))
 SCALE: cat(dim(1.1), include("1", "2", "3", "4", "5", "6", "7", "8", "9", "10", "11", "12", "13", "14", "15"), sort.statistic(summary.max(CV2)), reverse())
 SCALE: linear(dim(2), min(-1), max(1))
 ELEMENT: line(position(factors/type*base), color(color.black))
 ELEMENT: point(position(factors/type*CV1), shape.interior("CV1"), color.interior("CV1"))
 ELEMENT: point(position(factors/type*CV2), shape.interior("CV2"), color.interior("CV2"))
END GPL.

*Arrow going from CV1 to CV2.
GGRAPH
  /GRAPHDATASET NAME="graphdataset" VARIABLES=factors CV1 CV2 type
  /GRAPHSPEC SOURCE=INLINE.
BEGIN GPL
 SOURCE: s=userSource(id("graphdataset"))
 DATA: factors=col(source(s), name("factors"), unit.category())
 DATA: type=col(source(s), name("type"), unit.category())
 DATA: CV1=col(source(s), name("CV1"))
 DATA: CV2=col(source(s), name("CV2"))
 TRANS: diff=eval(abs(CV1 - CV2))
 TRANS: base=eval(0)
 GUIDE: axis(dim(1), opposite())
 GUIDE: axis(dim(2), label("CV"))
 SCALE: cat(dim(1.1), include("1", "2", "3", "4", "5", "6", "7", "8", "9", "10", "11", "12", "13", "14", "15"), sort.statistic(summary.max(diff)))
 SCALE: linear(dim(2), min(-1), max(1))
 ELEMENT: line(position(factors/type*base), color(color.black))
 ELEMENT: edge(position(factors/type*(CV1+CV2)), shape.interior(shape.arrow), color.interior(color.red)) 
 ELEMENT: point(position(factors/type*CV1), shape.interior(shape.circle), color.interior(color.red))
END GPL.

*If you must, polar coordinate helio like plot.
GGRAPH
  /GRAPHDATASET NAME="graphdataset" VARIABLES=factors CV1 CV2 type
  /GRAPHSPEC SOURCE=INLINE.
BEGIN GPL
 SOURCE: s=userSource(id("graphdataset"))
 DATA: factors=col(source(s), name("factors"), unit.category())
 DATA: type=col(source(s), name("type"), unit.category())
 DATA: CV1=col(source(s), name("CV1"))
 DATA: CV2=col(source(s), name("CV2"))
 TRANS: base=eval(0)
 COORD: polar()
 GUIDE: axis(dim(2), null())
 SCALE: cat(dim(1), include("1", "2", "3", "4", "5", "6", "7", "8", "9", "10", "11", "12", "13", "14", "15"))
 SCALE: linear(dim(2), min(-1), max(1))
 ELEMENT: line(position(factors*base), color(color.black), closed())
 ELEMENT: edge(position(factors*(base+CV1)), shape.interior(shape.dash), color.interior(type))
 ELEMENT: point(position(factors*CV1), shape.interior(type), color.interior(type))
END GPL.

*Extras - not necesarrily recommended.

*Bars instead of lines in polar coordinates.
GGRAPH
  /GRAPHDATASET NAME="graphdataset" VARIABLES=factors CV1 CV2 type
  /GRAPHSPEC SOURCE=INLINE.
BEGIN GPL
 SOURCE: s=userSource(id("graphdataset"))
 DATA: factors=col(source(s), name("factors"), unit.category())
 DATA: type=col(source(s), name("type"), unit.category())
 DATA: CV1=col(source(s), name("CV1"))
 DATA: CV2=col(source(s), name("CV2"))
 TRANS: base=eval(0)
 COORD: polar()
 GUIDE: axis(dim(2), null())
 SCALE: cat(dim(1), include("1", "2", "3", "4", "5", "6", "7", "8", "9", "10", "11", "12", "13", "14", "15"))
 SCALE: linear(dim(2), min(-1), max(1))
 ELEMENT: line(position(factors*base), color(color.black), closed())
 ELEMENT: interval(position(factors*(base+CV1)), shape.interior(shape.square), color.interior(type))
END GPL.

*Clustering between CV1 and CV2? - need to reshape.
varstocases
/make CV from CV1 CV2
/index order.

value labels order
1 'CV1'
2 'CV2'.

*Clustered Bar.
GGRAPH
  /GRAPHDATASET NAME="graphdataset" VARIABLES=factors type CV order 
  /GRAPHSPEC SOURCE=INLINE.
BEGIN GPL
 SOURCE: s=userSource(id("graphdataset"))
 DATA: factors=col(source(s), name("factors"), unit.category())
 DATA: type=col(source(s), name("type"), unit.category())
 DATA: CV=col(source(s), name("CV"))
 DATA: order=col(source(s), name("order"), unit.category())
 COORD: rect(dim(1,2))
 GUIDE: axis(dim(3), label("factors"))
 GUIDE: axis(dim(2), label("CV"))
 GUIDE: legend(aesthetic(aesthetic.color.interior))
 SCALE: cat(aesthetic(aesthetic.color.interior))
 ELEMENT: interval.dodge(position(factors/type*CV)), color.interior(order),shape.interior(shape.square))
END GPL.
***********************************************************************************.

Restricted cubic splines in SPSS

I’ve made a macro to estimate restricted cubic spline (RCS) basis in SPSS. Splines are useful tools to model non-linear relationships. Splines are useful exploratory tools to model non-linear relationships by transforming the independent variables in multiple regression equations. See Durrleman and Simon (1989) for a simple intro. I’ve largely based my implementation around the various advice Frank Harell has floating around the internet (see the rcspline function in his HMisc R package), although I haven’t read his book (yet!!).

So here is the SPSS MACRO (updated link to newer version, older version on google code before 1/3/2022 had an error, see Maria’s comment, but my version in the Code Snippets page was correct), and below is an example of its implementation. It takes either an arbitrary number of knots, and places them at the default locations according to quantiles of x’s. Or you can specify the exact locations of the knots. RCS need at least three knots, because they are restricted to be linear in the tails, and so will return k – 2 bases (where k is the number of knots). Below is an example of utilizing the default knot locations, and a subsequent plot of the 95% prediction intervals and predicted values superimposed on a scatterplot.


FILE HANDLE macroLoc /name = "D:\Temp\Restricted_Cubic_Splines".
INSERT FILE = "macroLoc\MACRO_RCS.sps".

*Example of there use - data example taken from http://www-01.ibm.com/support/docview.wss?uid=swg21476694.
dataset close ALL.
output close ALL.
SET SEED = 2000000.
INPUT PROGRAM.
LOOP xa = 1 TO 35.
LOOP rep = 1 TO 3.
LEAVE xa.
END case.
END LOOP.
END LOOP.
END file.
END INPUT PROGRAM.
EXECUTE.
* EXAMPLE 1.
COMPUTE y1=3 + 3*xa + normal(2).
IF (xa gt 15) y1=y1 - 4*(xa-15).
IF (xa gt 25) y1=y1 + 2*(xa-25).
GRAPH
/SCATTERPLOT(BIVAR)=xa WITH y1.

*Make spline basis.
*set mprint on.
!rcs x = xa n = 4.
*Estimate regression equation.
REGRESSION
  /MISSING LISTWISE
  /STATISTICS COEFF OUTS R ANOVA
  /CRITERIA=PIN(.05) POUT(.10) CIN(95)
  /NOORIGIN
  /DEPENDENT y1
  /METHOD=ENTER xa  /METHOD=ENTER splinex1 splinex2
  /SAVE PRED ICIN .
formats y1 xa PRE_1 LICI_1 UICI_1 (F2.0).
*Now I can plot the observed, predicted, and the intervals.
GGRAPH
  /GRAPHDATASET NAME="graphdataset" VARIABLES=xa y1 PRE_1 LICI_1 UICI_1
  /GRAPHSPEC SOURCE=INLINE.
BEGIN GPL
 SOURCE: s=userSource(id("graphdataset"))
 DATA: xa=col(source(s), name("xa"))
 DATA: y1=col(source(s), name("y1"))
 DATA: PRE_1=col(source(s), name("PRE_1"))
 DATA: LICI_1=col(source(s), name("LICI_1"))
 DATA: UICI_1=col(source(s), name("UICI_1"))
 GUIDE: axis(dim(1), label("xa"))
 GUIDE: axis(dim(2), label("y1"))
 ELEMENT: area.difference(position(region.spread.range(xa*(LICI_1+UICI_1))), color.interior(color.lightgrey), transparency.interior(transparency."0.5"))
 ELEMENT: point(position(xa*y1))
 ELEMENT: line(position(xa*PRE_1), color(color.red))
END GPL.

See the macro for an example of specifying the knot locations. I also placed functionality to estimate the basis by groups (for the default quantiles). My motivation was partly to replicate the nice functionality of ggplot2 to make smoothed regression estimates by groups. I don’t know off-hand though if having different knot locations between groups is a good idea, so caveat emptor and all that jazz.

I presume this is still needed functionality in SPSS, but if this was not needed let me know in the comments. Other examples are floating around (see this technote and this Levesque example), but this is the first I’ve seen of implementing the restricted cubic splines.

Viz. JTC Flow lines – Paper for ASC this fall

Partly because I would go crazy if I worked only on my dissertation, I started a paper about visualizing JTC flow lines awhile back, and I am going to present what I have so far at the American Society of Criminology (ASC) meeting at Atlanta this fall.

My paper is still quite rough around the edges (so not quite up for posting to SSRN), but here is the current version. This actually started out as an answer I gave to a question on the GIS stackexchange site, and after I wrote it up I figured it would be worthwhile endeavor to write an article. Alasdair Rae has a couple of viz. flow data papers currently, but I thought I could extend those papers and write for a different audience of criminologists using journey to crime (JTC) data.

As always, I would still appreciate any feedback. I’m hoping to send this out to a journal in the near future, and so far I have only goated one of my friends into reviewing the paper.

Viz. weighted regression in SPSS and some discussion

Here I wish to display some examples of visually weighted regression diagnostics in SPSS, along with some discussion about the goals and relationship to the greater visualization literature I feel is currently missing from the disscussion. To start, the current label of “visually weighted regression” can be attributed to Solomon Hsiang. Below are some of the related discussions (on both Solomon’s and Andrew Gelman’s blog), and a paper Solomon has currently posted on SSRN.

Also note that Felix Schonbrodt has provided example implementations in R. Also the last link is an example from the is.R() blog.

Hopefully that is near everyone (and I have not left out any discussion!)

A rundown of their motivation (although I encourage everyone to either read Solomon’s paper or the blog posts), is that regression estimates have a certain level of uncertainty. Particularly at the ends of the sample space of the independent variable observations, and especially for non-linear regression estimates, the uncertainty tends to be much greater than where we have more sample observations. The point of visually weighted regression is to deemphasize area of the plot where our uncertainty about the predicted values is greatest. This conversely draws ones eye to the area of the plot where the estimate is most certain.

I’ll discuss the grammar of these graphs a little bit, and from there it should be clear how to implement them in whatever software (as long as it supports transparency and fitting the necessary regression equations!). So even though I’m unaware of any current SAS (or whatever) examples, I’m sure they can be done.

SPSS Implementation

First lets just generate some fake data in SPSS, fit a predicted regression line, and plot the intervals using lines.


*******************************.
set seed = 10. /* sets random seed generator to make exact data reproducible */.
input program.
loop #j = 1 to 100. /*I typically use scratch variables (i.e. #var) when making loops.
    compute X = RV.NORM(0,1). /*you can use the random number generators to make different types of data.
    end case.
end loop.
end file.
end input program.
dataset name sim.
execute. /*note spacing is arbitrary and is intended to make code easier to read.
*******************************.

compute Y = 0.5*X + RV.NORM(0,SQRT(0.5)).
exe.

REGRESSION
  /MISSING LISTWISE
  /STATISTICS COEFF OUTS R ANOVA
  /CRITERIA=PIN(.05) POUT(.10) CIN(95)
  /NOORIGIN
  /DEPENDENT Y
  /METHOD=ENTER X
  /SAVE PRED MCIN.

*Can map seperate variable based on size of interval to color and transparency.

compute size = UMCI_1 - LMCI_1.
exe.
formats UMCI_1 LMCI_1 Y X size PRE_1 (F1.0).

*Simple chart with lines.
GGRAPH
  /GRAPHDATASET NAME="graphdataset" VARIABLES=X Y PRE_1 LMCI_1 UMCI_1 MISSING=LISTWISE
  REPORTMISSING=NO
  /GRAPHSPEC SOURCE=INLINE DEFAULTTEMPLATE=yes.
BEGIN GPL
 SOURCE: s=userSource(id("graphdataset"))
 DATA: X=col(source(s), name("X"))
 DATA: Y=col(source(s), name("Y"))
 DATA: PRE_1=col(source(s), name("PRE_1"))
 DATA: LMCI_1=col(source(s), name("LMCI_1"))
 DATA: UMCI_1=col(source(s), name("UMCI_1"))
 GUIDE: axis(dim(1), label("X"))
 GUIDE: axis(dim(2), label("Y"))
 SCALE: linear(dim(1), min(-3.8), max(3.8))
 SCALE: linear(dim(2), min(-3), max(3))
 ELEMENT: point(position(X*Y), size(size."2"))
 ELEMENT: line(position(X*PRE_1), color.interior(color.red))
 ELEMENT: line(position(X*LMCI_1), color.interior(color.grey))
 ELEMENT: line(position(X*UMCI_1), color.interior(color.grey))
END GPL.

In SPSS’s grammar, it is simple to plot the predicted regression line with areas of the higher confidence interval as more transparent. Here I use saved values from the regression equation, but you can also use functions within GPL (see smooth.linear and region.confi.smooth).


*Using path with transparency between segments.
GGRAPH
  /GRAPHDATASET NAME="graphdataset" VARIABLES=X Y PRE_1 size 
  /GRAPHSPEC SOURCE=INLINE.
BEGIN GPL
 SOURCE: s=userSource(id("graphdataset"))
 DATA: X=col(source(s), name("X"))
 DATA: Y=col(source(s), name("Y"))
 DATA: PRE_1=col(source(s), name("PRE_1"))
 DATA: size=col(source(s), name("size"))
 GUIDE: axis(dim(1), label("X"))
 GUIDE: axis(dim(2), label("Y"))
 GUIDE: legend(aesthetic(aesthetic.transparency.interior), null())
 SCALE: linear(dim(1), min(-3.8), max(3.8))
 SCALE: linear(dim(2), min(-3), max(3))
 ELEMENT: point(position(X*Y), size(size."2"))
 ELEMENT: line(position(X*PRE_1), color.interior(color.red), transparency.interior(size), size(size."4"))
END GPL.

It is a bit harder to make the areas semi-transparent throughout the plot. If you use an area.difference ELEMENT, it makes the entire area a certain amount of transparency. If you use intervals with the current data, the area will be too sparse. So what I do is make new data, sampling more densley along the x axis and make the predictions. From this we can use interval element to plot the predictions, mapping the size of the interval to transparency and color saturation.


*make new cases to have a consistent sampling of x values to make the intervals.

input program.
loop #j = 1 to 500.
    compute #min = -5.
    compute #max = 5.
    compute X = #min + (#j - 1)*(#max - #min)/500.
    compute new = 1.
    end case.
    end loop.
end file.
end input program.
dataset name newcases.
execute.

dataset activate sim.
add files file = *
/file = 'newcases'.
exe.
dataset close newcases.

match files file = *
/drop UMCI_1 LMCI_1 PRE_1.

REGRESSION
  /MISSING LISTWISE
  /STATISTICS COEFF OUTS R ANOVA
  /CRITERIA=PIN(.05) POUT(.10) CIN(95)
  /NOORIGIN
  /DEPENDENT Y
  /METHOD=ENTER X
  /SAVE PRED MCIN.

compute size = UMCI_1 - LMCI_1.
formats ALL (F1.0).

temporary.
select if new = 1.
GGRAPH
  /GRAPHDATASET NAME="graphdataset" VARIABLES=X PRE_1 LMCI_1 UMCI_1 size MISSING=LISTWISE
  REPORTMISSING=NO
  /GRAPHSPEC SOURCE=INLINE.
BEGIN GPL
 SOURCE: s=userSource(id("graphdataset"))
 DATA: X=col(source(s), name("X"))
 DATA: PRE_1=col(source(s), name("PRE_1"))
 DATA: LMCI_1=col(source(s), name("LMCI_1"))
 DATA: UMCI_1=col(source(s), name("UMCI_1"))
 DATA: size=col(source(s), name("size"))
 TRANS: sizen = eval(size*-1)
 TRANS: sizer = eval(size*.01)
 GUIDE: axis(dim(1), label("X"))
 GUIDE: axis(dim(2), label("Y"))
 GUIDE: legend(aesthetic(aesthetic.transparency.interior), null())
 GUIDE: legend(aesthetic(aesthetic.transparency.exterior), null())
 GUIDE: legend(aesthetic(aesthetic.color.saturation.exterior), null())
 SCALE: linear(aesthetic(aesthetic.transparency), aestheticMinimum(transparency."0.90"), aestheticMaximum(transparency."1"))
 SCALE: linear(aesthetic(aesthetic.color.saturation), aestheticMinimum(color.saturation."0"), 
              aestheticMaximum(color.saturation."0.01"))
 SCALE: linear(dim(1), min(-5.5), max(5))
 SCALE: linear(dim(2), min(-3), max(3))
 ELEMENT: interval(position(region.spread.range(X*(LMCI_1 + UMCI_1))), transparency.exterior(size), color.exterior(color.red), size(size."0.005"), 
                  color.saturation.exterior(sizen))
 ELEMENT: line(position(X*PRE_1), color.interior(color.darkred), transparency.interior(sizer), size(size."5"))
END GPL.
exe.

Unfortunately, this creates some banding effects. Sampling fewer points makes the banding effects worse, and sampling more reduces the ability to make the plot transparent (and it is still produces banding effects). So, to produce one that looks this nice took some experimentation with how densely the new points were sampled, how aesthetics were mapped, and how wide the interval lines would be.

I tried to map a size aesthetic to the line and it works ok, you can still see some banding effects. Also note, to get the size of the line to be vertical (as oppossed to oriented in whatever direction the line is orientated) one needs to use a step line function. The jump() specification makes it so the vertical lines in the step chart aren’t visible. It took some trial and error to map the size to the exact interval (not sure if one can use the percent specifications to fix that trial and error). The syntax for lines though generalizes to multiple groups in SPSS easier than does the interval elements (although Solomon comments on one of Felix’s blog post that he prefers the non-interval plots with multiple groups, due to drawing difficulties and getting too busy I believe). Also FWIW it took less fussing with the density of the sample points and drawing of transparency to make the line mapped to size look nice.


temporary.
select if new = 1.
GGRAPH
  /GRAPHDATASET NAME="graphdataset" VARIABLES=X PRE_1 LMCI_1 UMCI_1 size MISSING=LISTWISE
  REPORTMISSING=NO
  /GRAPHSPEC SOURCE=INLINE.
BEGIN GPL
 SOURCE: s=userSource(id("graphdataset"))
 DATA: X=col(source(s), name("X"))
 DATA: PRE_1=col(source(s), name("PRE_1"))
 DATA: LMCI_1=col(source(s), name("LMCI_1"))
 DATA: UMCI_1=col(source(s), name("UMCI_1"))
 DATA: size=col(source(s), name("size"))
 GUIDE: axis(dim(1), label("X"))
 GUIDE: axis(dim(2), label("Y"))
 GUIDE: legend(aesthetic(aesthetic.transparency.interior), null())
 GUIDE: legend(aesthetic(aesthetic.transparency.exterior), null())
 GUIDE: legend(aesthetic(aesthetic.size), null())
 SCALE: linear(aesthetic(aesthetic.size), aestheticMinimum(size."0.16in"), aestheticMaximum(size."1.05in"))
 SCALE: linear(aesthetic(aesthetic.transparency.interior), aestheticMinimum(transparency."0.5"), aestheticMaximum(transparency."1"))
 SCALE: linear(dim(1), min(-5.5), max(5))
 SCALE: linear(dim(2), min(-3), max(3))
 ELEMENT: line(position(smooth.step.left(X*PRE_1)), jump(), color.interior(color.black), transparency.interior(size), size(size))
 ELEMENT: line(position(X*PRE_1), color.interior(color.black), transparency.interior(size), size(size."3"))
END GPL.
exe.
*Add these two lines to see the actual intervals line up (without ending period).
*ELEMENT: line(position(X*LMCI_1), color.interior(color.black)).
*ELEMENT: line(position(X*UMCI_1), color.interior(color.black)).

Also note Solomon suggests that the saturation of the plot should be higher towards the mean of the predicted value. I don’t do that here (but have a superimposed predicted line you can see). A way to do that in SPSS would be to make multiple intervals and continually superimpose them (see Maltz and Zawitz (1998) for an applied example of something very similar). Another way may involve using color gradients for the intervals (which isn’t possible through syntax, but is through a chart template). There are other examples that I could do in SPSS (spaghetti plots of bootstrapped estimates, discrete bins for certain intervals) but I don’t provide examples of them for reasons noted below.

I will try to provide some examples of more interesting non-linear graphs in the near future (I recently made a macro to estimate restricted cubic spline bases). But this should be enough for now to show how to implement such plots in SPSS for everyone, and the necessary grammar to make the charts.

Some notes on current discussion and implementations

My main critiques of the current implementations (and really more so the discussion) are more curmudgeonly than substantive, but hopefully it is clear enough to provide some more perspective on the work. I’ll start by saying that, it is unclear if either Solomon or Felix have read the greater visualization literature on visualizing uncertainty. While I can’t fault Felix for that so much (it is a bit much to expect a blog post to have a detailed bibliography) Solomon has at least posted a paper on SSRN. I don’t mean this as too much of a critique to Solomon, he has a good idea, and a good perspective on visualization (if you read his blog he has plenty of nice examples). But, it is more aimed at a particular set of potential alternative plots that Solomon and Felix have presented that I don’t feel are very good ideas.

Like all scientific work, we stand on the shoulders of those who come before us. While I haven’t explicitly seen visually weighted regression plots in any prior work, there are certainly many very similar examples. The most obvious would probably be the discussion of Jackson (2008), and for applied examples of this technique to very similar regression contexts are Maltz and Zawitz (1998) and Esarey and Pierce (2012) (besides Jackson (2008), there is a variety of potential other related literature cited in the discussion to Gelman’s blog posts – but this article is blatently related). There are undoubtedly many more, likely even older than the Maltz paper, and there is a treasure trove of papers about displaying error bars on this Andrew Gelman post. Besides proper attribution, this isn’t just pedantic, we should take the lessons learned from the prior literature and apply them to our current situation. There are large literatures on visualizaing uncertainty, and it is a popular enough topic that it has its own sections in cartography and visualization textbooks (MacEachren 2004; Slocum et al. 2005; Wilkinson 2005).

In particular, there is one lesson I feel should strongly reflect on the current discussion, and that is visualizing crisp lines in graphics implies the exact opposite of uncertainty to the viewers. Spiegelhalter, Pearson, and Short (2011) have an example of this, where a graphic about a tornado warning was taken a bit more to heart than it should have, and instead of people interpreting the areas of highest uncertainty in the predicted path as just that, they interpreted it as more a deterministic. There appears to be good agreement about using alpha blending (Roth, Woodruff, and Johnson 2010), and having fuzzy lines are effective ways of displaying uncertainty (MacEachren 2004; Wood et al. 2012). Thus, we have good evidence that, if the goal of the plot is to deemphasize portions of the regression that have large amounts of uncertainty in the estimates, we should not plot those estimates using discrete cut-offs. This is why I find Felix’s poll results unfortunate, in that the plot with the discrete cut-offs is voted the highest by viewers of the blog post!

So here is an example graph by Felix of the discrete bins (note this is the highest voted image in Felix’s poll!). Again to be clear, discrete bins suggests the exact opposite of uncertainty, and certainly does not deemphasize areas of the plot that have the greatest amount of uncertainty.

Here is the example of the plot from Solomon that also has a similar problem with discrete bins. The colors portray uncertainty, but it is plain to see the lattice on the plot, and I don’t understand why this meets any of Solomon’s original goals. It takes ink to plot the lattice!

More minor, but still enough to guide our implementations, the plots that superimpose multiple bootstrapped estimates, while they are likely ok to visualize uncertainty, the resulting spaghetti make the plots much more complex. The shaded areas maintain a much more condense and clear to understand visual, while superimposing multiple lines on the plot creates a difficult to envision distribution (here I have an example on the CV blog, and it is taken from Carr and Pickle (2009)). It may aid understanding uncertainty about the regression estimate, but it detracts from visualizing any more global trends in the regression estimate. It also fails to meet the intial goal of deemphasizing areas of the plot that are most uncertain. It accomplishes quite the opposite actually, and areas where the bootstrapped estimates have a greater variance will draw more attention because they are more dispersed on the plot.

Here is an example from Solomon’s blog of the spaghetti plots with the lines drawn heavily transparent.

Solomon writes about the spaghetti plot distraction in his SSRN paper, but still presents the examples as if they are reasonable alternatives (which is strange). I would note these would be fine and dandy if visualizing the uncertainty was itself an original goal of the plot, but that isn’t the goal! To a certain extent, displaying an actual interval is countervailing to the notion of deemphasizing that area of the chart. The interval needs to command a greater area of the chart. I think Solomon has some very nice examples where the tradeoff is reasonable, with plotting the areas with larger intervals in lower color saturation (here I use transparency to the same effect). I doubt this is news to Solomon – what he writes in his SSRN paper conforms to what I’m saying as far as I can tell – I’m just confused why he presents some examples as if they are reasonable alternatives. I think it deserves reemphasis though given all the banter and implementations floating around the internet, especially with some of the alternatives Felix has presented.

I’m not sure if Solomon and Felix really appreciate though the distinction between hard lines and soft lines though after reading the blog post(s) and the SSRN paper. Of course these assertions and critiques of mine should be tested in experimental settings, but we should not ignore prior research in spite of a lack of experimental findings. I don’t want these critiques to be viewed too harshly though, and I hope Solomon and Felix take them to heart (either in future implementations or actual papers discussing the technique).


Citations

Carr, Daniel B., and Linda Williams Pickle. 2009. Visualizing Data Patterns with Micromaps. Boca Rotan, FL: CRC Press.

Esarey, Justin, and Andrew Pierce. 2012. Assessing fit quality and testing for misspecification in binary-dependent variable models. Political Analysis 20: 480–500.

Hsiang, Solomon M. 2012. Visually-Weighted Regression.

Jackson, Christopher H. 2008. Displaying uncertainty with shading. The American Statistician 62: 340–47.

MacEachren, Alan M. 2004. How maps work: Representation, visualization, and design. New York, NY: The Guilford Press.

Maltz, Michael D., and Marianne W. Zawitz. 1998. Displaying violent crime trends using estimates from the National Crime Victimization Survey. US Department of Justice, Office of Justice Programs, Bureau of Justice Statistics.

Roth, Robert E., Andrew W. Woodruff, and Zachary F. Johnson. 2010. Value-by-alpha maps: An alternative technique to the cartogram. The Cartographic Journal 47: 130–40.

Slocum, Terry A., Robert B. McMaster, Fritz C. Kessler, and Hugh H. Howard. 2005. Thematic cartography and geographic visualization. Prentice Hall.

Spiegelhalter, David, Mike Pearson, and Ian Short. 2011. Visualizing uncertainty about the future. Science 333: 1393–1400.

Wilkinson, Leland. 2005. The grammar of graphics. New York, NY: Springer.

Wood, Jo, Petra Isenberg, Tobias Isenberg, Jason Dykes, Nadia Boukhelifa, and Aidan Slingsby. 2012. Sketchy Rendering for Information Visualization. Visualization and Computer Graphics, IEEE Transactions on 18: 2749–58.

Calendar Heatmap in SPSS

Here is just a quick example of making calendar heatmaps in SPSS. My motivation can be seen from similar examples of calendar heatmaps in R and SAS (I’m sure others exist as well). Below is an example taken from this Revo R blog post.

The code involves a macro that can take a date variable, and then calculate the row position the date needs to go in the calendar heatmap (rowM), and also returns a variable for the month and year, which are used in the subsequent plot. It is brief enough I can post it here in its entirety.


*************************************************************************************.
*Example heatmap.

DEFINE !heatmap (!POSITIONAL !TOKENS(1)).
compute month = XDATE.MONTH(!1).
value labels month
1 'Jan.'
2 'Feb.'
3 'Mar.'
4 'Apr.'
5 'May'
6 'Jun.'
7 'Jul.'
8 'Aug.'
9 'Sep.'
10 'Oct.'
11 'Nov.'
12 'Dec.'.
compute weekday = XDATE.WKDAY(!1).
value labels weekday
1 'Sunday'
2 'Monday'
3 'Tuesday'
4 'Wednesday'
5 'Thursday'
6 'Friday'
7 'Saturday'.
*Figure out beginning day of month.
compute #year = XDATE.YEAR(!1).
compute #rowC = XDATE.WKDAY(DATE.MDY(month,1,#year)).
compute #mDay = XDATE.MDAY(!1).
*Now ID which row for the calendar heatmap it belongs to.
compute rowM = TRUNC((#mDay + #rowC - 2)/7) + 1.
value labels rowM
1 'Row 1'
2 'Row 2'
3 'Row 3'
4 'Row 4'
5 'Row 5'
6 'Row 6'.
formats rowM weekday (F1.0).
formats month (F2.0).
*now you just need to make the GPL call!.
!ENDDEFINE.

set seed 15.
input program.
loop #i = 1 to 365.
    compute day = DATE.YRDAY(2013,#i).
    compute flag = RV.BERNOULLI(0.1).
    end case.
end loop.
end file.
end input program.
dataset name days.
format day (ADATE10).
exe.

!heatmap day.
exe.
temporary.
select if flag = 1.
GGRAPH
  /GRAPHDATASET NAME="graphdataset" VARIABLES=weekday rowM month
  /GRAPHSPEC SOURCE=INLINE.
BEGIN GPL
 SOURCE: s=userSource(id("graphdataset"))
 DATA: weekday=col(source(s), name("weekday"), unit.category())
 DATA: rowM=col(source(s), name("rowM"), unit.category())
 DATA: month=col(source(s), name("month"), unit.category())
 COORD: rect(dim(1,2),wrap())
 GUIDE: axis(dim(1))
 GUIDE: axis(dim(2), null())
 GUIDE: axis(dim(4), opposite())
 SCALE: cat(dim(1), include("1.00", "2.00", "3.00", "4.00", "5.00","6.00", "7.00"))
 SCALE: cat(dim(2), reverse(), include("1.00", "2.00", "3.00", "4.00", "5.00","6.00"))
 SCALE: cat(dim(4), include("1.00", "2.00", "3.00", "4.00", "5.00",
  "6.00", "7.00", "8.00", "9.00", "10.00", "11.00", "12.00"))
 ELEMENT: polygon(position(weekday*rowM*1*month), color.interior(color.red))
END GPL.
*************************************************************************************.

Which produces this image below. You can not run the temporary command to see what the plot looks like with the entire year filled in.

This is nice to illustrate potential day of week patterns for specific events that only rarely occur, but you can map any aesthetic you please to the color of the polygon (or you can change the size of the polygons if you like). Below is an example I used this recently to demonstrate what days a spree of crimes appeared on, and I categorically colored certain dates to indicate multiple crimes occurred on those dates. It is easy to see from the plot that there isn’t a real strong tendency for any particular day of week, but there is some evidence of spurts of higher activity.

In terms of GPL logic I won’t go into too much detail, but the plot works even with months or rows missing in the data because of the finite number of potential months and rows in the plot (see the SCALE statements with the explicit categories included). If you need to plot multiple years, you either need seperate plots or another facet. Most of the examples show numerical information over every day, which is difficult to really see patterns like that, but it shouldn’t be entirely disgarded just because of that (I would have to simultaneously disregard every choropleth map ever made if I did that!)

Fluctuation diagrams in SPSS

The other day on my spineplot post Jon Peck made a comment about how he liked the structure charts in this CV thread. Here I will show how to make them in SPSS (FYI the linked thread has an example of how to make them in R using ggplot2 if you are interested).

Unfortunately I accidently called them a structure plot in the original CV thread, when they are actually called fluctuation diagrams (see Pilhofer et al. (2012) and Wickham & Hofmann (2011) for citations). They are basically just binned scatterplots for categorical data, and the size of a point is mapped to the number of observations that fall within that bin. Below is the example (in ggplot2) taken from the CV thread.

So, to make these in SPSS you first need some categorical data, you can follow along with any two categorical variables (or at the end of the post I have the complete syntax with some fake categorical data). First, it is easier to start with some boilerplate code generated through the GUI. If you have any data set open that has categorical data in it (unaggregated) you can simply open up the chart builder dialog, choose a barplot, place the category you want on the x axis, then place the category you want on the Y axis as a column panel for a paneled bar chart.

The reason you make this chart is that the GUI interprets the default behavior of this bar chart is to aggregate the frequencies. You make the colum panel just so the GUI will write out the data definitions for you. If you pasted the chart builder syntax then the GPL code will look like below.


*Fluctuation plots - first make column paneled bar chart.
GGRAPH
  /GRAPHDATASET NAME="graphdataset" VARIABLES=Dim1[LEVEL=NOMINAL] COUNT()
  [name="COUNT"] Dim2[LEVEL=NOMINAL] MISSING=LISTWISE REPORTMISSING=NO
  /GRAPHSPEC SOURCE=INLINE.
BEGIN GPL
 SOURCE: s=userSource(id("graphdataset"))
 DATA: Dim1=col(source(s), name("Dim1"), unit.category())
 DATA: COUNT=col(source(s), name("COUNT"))
 DATA: Dim2=col(source(s), name("Dim2"), unit.category())
 GUIDE: axis(dim(1), label("Dim1"))
 GUIDE: axis(dim(2), label("Count"))
 GUIDE: axis(dim(3), label("Dim2"), opposite())
 SCALE: cat(dim(1))
 SCALE: linear(dim(2), include(0))
 SCALE: cat(dim(3))
 ELEMENT: interval(position(Dim1*COUNT*Dim2), shape.interior(shape.square))
END GPL.

With this boilerplate code though we can edit to make the chart we want. Here I outline some of those steps. Only editing the ELEMENT portion, the steps below are;

  • Edit the ELEMENT statement to be a point instead of interval.
  • Delete COUNT within the position statement (within the ELEMENT).
  • Change shape.interior to shape.
  • Add in ,size(COUNT) after shape(shape.square).
  • Add in ,color.interior(COUNT) after size(COUNT).

Those are all of the necessary statements to produce the fluctuation chart. The next two are to make the chart look nicer though.

  • Add in aesthetic mappings for scale statements (both the color and the size).
  • Change the guide statements to have the correct labels (and delete the dim(3) GUIDE).

The GPL code call then looks like this (with example aesthetic mappings) and below that is the chart it produces.


*In the end fluctuation plot.
GGRAPH
  /GRAPHDATASET NAME="graphdataset" VARIABLES=Dim1 Dim2 COUNT()[name="COUNT"]
  /GRAPHSPEC SOURCE=INLINE.
BEGIN GPL
 SOURCE: s=userSource(id("graphdataset"))
 DATA: Dim1=col(source(s), name("Dim1"), unit.category())
 DATA: Dim2=col(source(s), name("Dim2"), unit.category())
 DATA: COUNT=col(source(s), name("COUNT"))
 GUIDE: axis(dim(1), label("Dim1"))
 GUIDE: axis(dim(2), label("Dim2"))
 SCALE: pow(aesthetic(aesthetic.size), aestheticMinimum(size."8px"), aestheticMaximum(size."45px"))
 SCALE: linear(aesthetic(aesthetic.color.interior), aestheticMinimum(color.lightgrey), aestheticMaximum(color.darkred))
 ELEMENT: point(position(Dim1*Dim2), shape(shape.square), color.interior(COUNT), size(COUNT))
END GPL.

Aesthetically, besides the usual niceties the only thing to note is that the size of the squares typically needs to be changed to fill up the space (you would have to be lucky to have an exact mapping between area and the categorical count to work out). I presume squares are preferred because area assessments with squares tend to be more accurate than circles, but that is just my guess (you could use any shape you wanted). I use a power scale for size aesthetic, as the area for a square increases by the size of the side squared (and people interpret the areas in the plot, not the size of the side of the square). SPSS’s default exponent for a power scale is 0.5, which is the square root so exactly what we want. You just need to supply a reasonable start and end size for the squares to let them fill up the space depending on your counts. Unfortunately, SPSS does not make a correctly scaled legend in size, but the color aesthetic is correct (I leave it in only to show that it is incorrect, if for publication I would like suppress the different sizes and only show the color gradient). (Actually, my V20 continues to not respect shape aesthetics that aren’t mapped – and this is produced via post-hoc editing of the shape – owell).

Here I show two redundant continuous aesthetic scales (size and color). SPSS’s behavior is to make the legend discrete instead of continuous. In Wilkinson’s Grammar of Graphics he states that he prefers discrete scales (even for continous aesthetics) to aid lookup.


***********************************************************.
*Making random categorical data.
set seed 14.
input program.
loop #i = 1 to 1000.
    compute Prop = RV.UNIFORM(.5,1).
    end case.
end loop.
end file.
end input program.
dataset name cats.
exe.

compute Dim1 = RV.BINOMIAL(3,PROP).
compute Dim2 = RV.BINOMIAL(5,PROP).

*Fluctuation plots - first make column paneled bar chart.
GGRAPH
  /GRAPHDATASET NAME="graphdataset" VARIABLES=Dim1[LEVEL=NOMINAL] COUNT()
  [name="COUNT"] Dim2[LEVEL=NOMINAL] MISSING=LISTWISE REPORTMISSING=NO
  /GRAPHSPEC SOURCE=INLINE.
BEGIN GPL
 SOURCE: s=userSource(id("graphdataset"))
 DATA: Dim1=col(source(s), name("Dim1"), unit.category())
 DATA: COUNT=col(source(s), name("COUNT"))
 DATA: Dim2=col(source(s), name("Dim2"), unit.category())
 GUIDE: axis(dim(1), label("Dim1"))
 GUIDE: axis(dim(2), label("Count"))
 GUIDE: axis(dim(3), label("Dim2"), opposite())
 SCALE: cat(dim(1))
 SCALE: linear(dim(2), include(0))
 SCALE: cat(dim(3))
 ELEMENT: interval(position(Dim1*COUNT*Dim2), shape.interior(shape.square))
END GPL.

*Then edit 1) element to point.
*2) delete COUNT within position statement
*3) shape.interior -> shape
*4) add in "size(COUNT)"
*5) add in "color.interior(COUNT)"
*6) add in aesthetic mappings for scale statements
*7) change guide statements - then you are done.

*In the end fluctuation plot.
GGRAPH
  /GRAPHDATASET NAME="graphdataset" VARIABLES=Dim1 Dim2 COUNT()[name="COUNT"]
  /GRAPHSPEC SOURCE=INLINE.
BEGIN GPL
 SOURCE: s=userSource(id("graphdataset"))
 DATA: Dim1=col(source(s), name("Dim1"), unit.category())
 DATA: Dim2=col(source(s), name("Dim2"), unit.category())
 DATA: COUNT=col(source(s), name("COUNT"))
 GUIDE: axis(dim(1), label("Dim1"))
 GUIDE: axis(dim(2), label("Dim2"))
 SCALE: pow(aesthetic(aesthetic.size), aestheticMinimum(size."8px"), aestheticMaximum(size."45px"))
 SCALE: linear(aesthetic(aesthetic.color.interior), aestheticMinimum(color.lightgrey), aestheticMaximum(color.darkred))
 ELEMENT: point(position(Dim1*Dim2), shape(shape.square), color.interior(COUNT), size(COUNT))
END GPL.

*Alternative ways to map sizes in the plot.
*SCALE: linear(aesthetic(aesthetic.size), aestheticMinimum(size."5%"), aestheticMaximum(size."30%")).
*SCALE: linear(aesthetic(aesthetic.size), aestheticMinimum(size."6px"), aestheticMaximum(size."18px")).

*Alternative jittered scatterplot - need to remove the agg variable COUNT.
*Replace point with point.jitter.
GGRAPH
  /GRAPHDATASET NAME="graphdataset" VARIABLES=Dim1 Dim2
  /GRAPHSPEC SOURCE=INLINE.
BEGIN GPL
 SOURCE: s=userSource(id("graphdataset"))
 DATA: Dim1=col(source(s), name("Dim1"), unit.category())
 DATA: Dim2=col(source(s), name("Dim2"), unit.category())
 GUIDE: axis(dim(1), label("Dim1"))
 GUIDE: axis(dim(2), label("Dim2"))
 ELEMENT: point.jitter(position(Dim1*Dim2))
END GPL.
***********************************************************.

Citations of Interest