
In a recent working paper I made a hexbin map all in R. (Gio did most of the hard work of data munging and modeling though!) Figured I would detail the process here for some notes. Hexagon binning is purportedly better than regular squares (to avoid artifacts of runs in discretized data). But the reason I use them in this circumstance is mostly just an aesthetic preference.
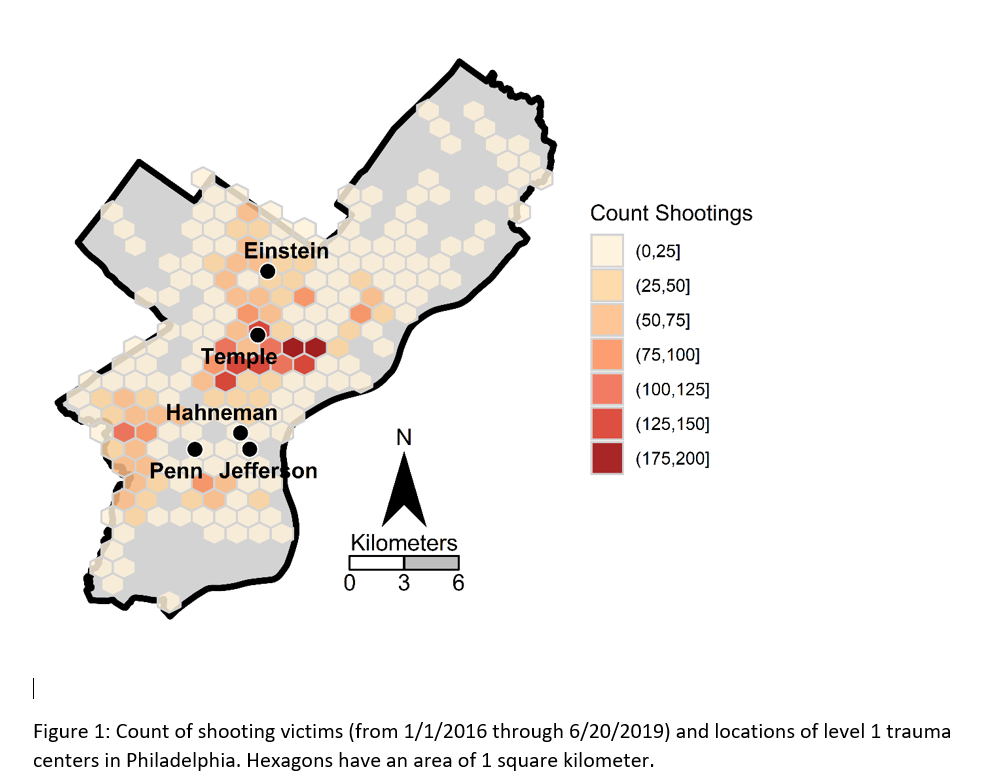
Two tricky parts to this: 1) making the north arrow and scale bar, and 2) figuring out the dimensions to make regular hexagons. As an illustration I use the shooting victim data from Philly (see the working paper for all the details) full data and code to replicate here. I will walk through a bit of it though.
Data Prep
First to start out, I just use these three libraries, and set the working directory to where my data is.
library(ggplot2)
library(rgdal)
library(proj4)
setwd('C:\\Users\\axw161530\\Dropbox\\Documents\\BLOG\\HexagonMap_ggplot\\Analysis')
Now I read in the Philly shooting data, and then an outline of the city that is projected. Note I read in the shapefile data using rgdal, which imports the projection info. I need that to be able to convert the latitude/longitude spherical coordinates in the shooting data to a local projection. (Unless you are making a webmap, you pretty much always want to use some type of local projection, and not spherical coordinates.)
#Read in the shooting data
shoot <- read.csv('shootings.csv')
#Get rid of missing
shoot <- shoot[!is.na(shoot$lng),c('lng','lat')]
#Read in the Philly outline
PhilBound <- readOGR(dsn="City_Limits_Proj.shp",layer="City_Limits_Proj")
#Project the Shooting data
phill_pj <- proj4string(PhilBound)
XYMeters <- proj4::project(as.matrix(shoot[,c('lng','lat')]), proj=phill_pj)
shoot$x <- XYMeters[,1]
shoot$y <- XYMeters[,2]
Making a Basemap
It is a bit of work to make a nice basemap in R and ggplot, but once that upfront work is done then it is really easy to make more maps. To start, the GISTools package has a set of functions to get a north arrow and scale bar, but I have had trouble with them. The ggsn package imports the north arrow as a bitmap instead of vector, and I also had a difficult time with its scale bar function. (I have not figured out the cartography package either, I can’t keep up with all the mapping stuff in R!) So long story short, this is my solution to adding a north arrow and scale bar, but I admit better solutions probably exist.
So basically I just build my own polygons and labels to add into the map where I want. Code is motivated based on the functions in GISTools.
#creating north arrow and scale bar, motivation from GISTools package
arrow_data <- function(xb, yb, len) {
s <- len
arrow.x = c(0,0.5,1,0.5,0) - 0.5
arrow.y = c(0,1.7 ,0,0.5,0)
adata <- data.frame(aX = xb + arrow.x * s, aY = yb + arrow.y * s)
return(adata)
}
scale_data <- function(llx,lly,len,height){
box1 <- data.frame(x = c(llx,llx+len,llx+len,llx,llx),
y = c(lly,lly,lly+height,lly+height,lly))
box2 <- data.frame(x = c(llx-len,llx,llx,llx-len,llx-len),
y = c(lly,lly,lly+height,lly+height,lly))
return(list(box1,box2))
}
x_cent <- 830000
len_bar <- 3000
offset_scaleNum <- 64300
arrow <- arrow_data(xb=x_cent,yb=67300,len=2500)
scale_bxs <- scale_data(llx=x_cent,lly=65000,len=len_bar,height=750)
lab_data <- data.frame(x=c(x_cent, x_cent-len_bar, x_cent, x_cent+len_bar, x_cent),
y=c( 72300, offset_scaleNum, offset_scaleNum, offset_scaleNum, 66500),
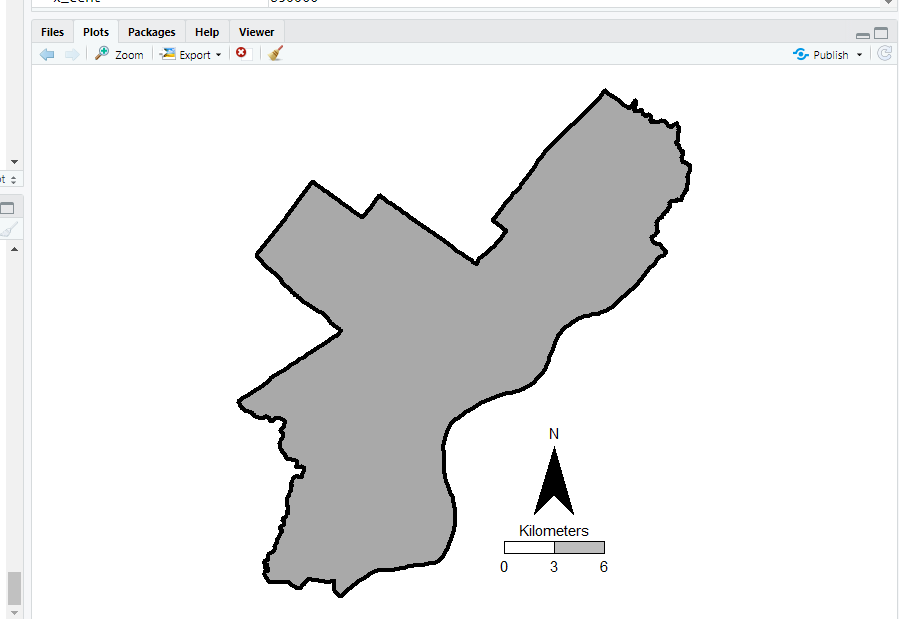
lab=c("N","0","3","6","Kilometers"))This is about the best I have been able to automate the creation of the north arrow and scale bar polygons, while still having flexibility where to place the labels. But now we have all of the ingredients necessary to make our basemap. Make sure to use coord_fixed() for maps! Also for background maps I typically like making the outline thicker, and then have borders for smaller polygons lighter and thinner to create a hierarchy. (If you don’t want the background map to have any color, use fill=NA.)
base_map <- ggplot() +
            geom_polygon(data=PhilBound,size=1.5,color='black', fill='darkgrey', aes(x=long,y=lat)) +
            geom_polygon(data=arrow, fill='black', aes(x=aX, y=aY)) +
            geom_polygon(data=scale_bxs[[1]], fill='grey', color='black', aes(x=x, y = y)) +
            geom_polygon(data=scale_bxs[[2]], fill='white', color='black', aes(x=x, y = y)) +
            geom_text(data=lab_data, size=4, aes(x=x,y=y,label=lab)) +
            coord_fixed() + theme_void()

#Check it out
base_map
This is what it looks like on my windows machine in RStudio — it ends up looking alittle different when I export the figure straight to PNG though. Will get to that in a minute.
Making a hexagon map
Now you have your basemap you can superimpose whatever other data you want. Here I wanted to visualize the spatial distribution of shootings in Philly. One option is a kernel density map. I tend to like aggregated count maps though better for an overview, since I don’t care so much for drilling down and identifying very specific hot spots. And the counts are easier to understand than densities.
In geom_hex you can supply a vertical and horizontal parameter to control the size of the hexagon — supplying the same for each does not create a regular hexagon though. The way the hexagon is oriented in geom_hex the vertical parameter is vertex to vertex, whereas the horizontal parameter is side to side.
Here are three helper functions. First, wd_hex gives you a horizontal width length given the vertical parameter. So if you wanted your hexagon to be vertex to vertex to be 1000 meters (so a side is 500 meters), wd_hex(1000) returns just over 866. Second, if for your map you wanted to convert the numbers to densities per unit area, you can use hex_area to figure out the size of your hexagon. Going again with our 1000 meters vertex to vertex hexagon, we have a total of hex_area(1000/2) is just under 650,000 square meters (or about 0.65 square kilometers).
For maps though, I think it makes the most sense to set the hexagon to a particular area. So hex_dim does that. If you want to set your hexagons to a square kilometer, given our projected data is in meters, we would then just do hex_dim(1000^2), which with rounding gives us vert/horz measures of about (1241,1075) to supply to geom_hex.
#ggplot geom_hex you need to supply height and width
#if you want a regular hexagon though, these
#are not equal given the default way geom_hex draws them
#https://www.varsitytutors.com/high_school_math-help/how-to-find-the-area-of-a-hexagon

#get width given height
wd_hex <- function(height){
  tri_side <- height/2
  sma_side <- height/4
  width <- 2*sqrt(tri_side^2 - sma_side^2)
  return(width)
}

#now to figure out the area if you want
#side is simply height/2 in geom_hex
hex_area <- function(side){
  area <- 6 * (  (sqrt(3)*side^2)/4 )
  return(area)
}

#So if you want your hexagon to have a regular area need the inverse function
#Gives height and width if you want a specific area
hex_dim <- function(area){
  num <- 4*area
  den <- 6*sqrt(3)
  vert <- 2*sqrt(num/den)
  horz <- wd_hex(height)
  return(c(vert,horz))
}

my_dims <- hex_dim(1000^2)   #making it a square kilometer
sqrt(hex_area(my_dims[1]/2)) #check to make sure it is square km
#my_dims also checks out with https://hexagoncalculator.apphb.com/
Now onto the good stuff. I tend to think discrete bins make nicer looking maps than continuous fills. So through some trial/error you can figure out the best way to make those via cut. Also I make the outlines for the hexagons thin and white, and make the hexagons semi-transparent. So you can see the outline for the city. I like how by default areas with no shootings are not given any hexagon.
lev_cnt <- seq(0,225,25)
shoot_count <- base_map +
geom_hex(data=shoot, color='white', alpha=0.85, size=0.1, binwidth=my_dims,
aes(x=x,y=y,fill=cut(..count..,lev_cnt))) +
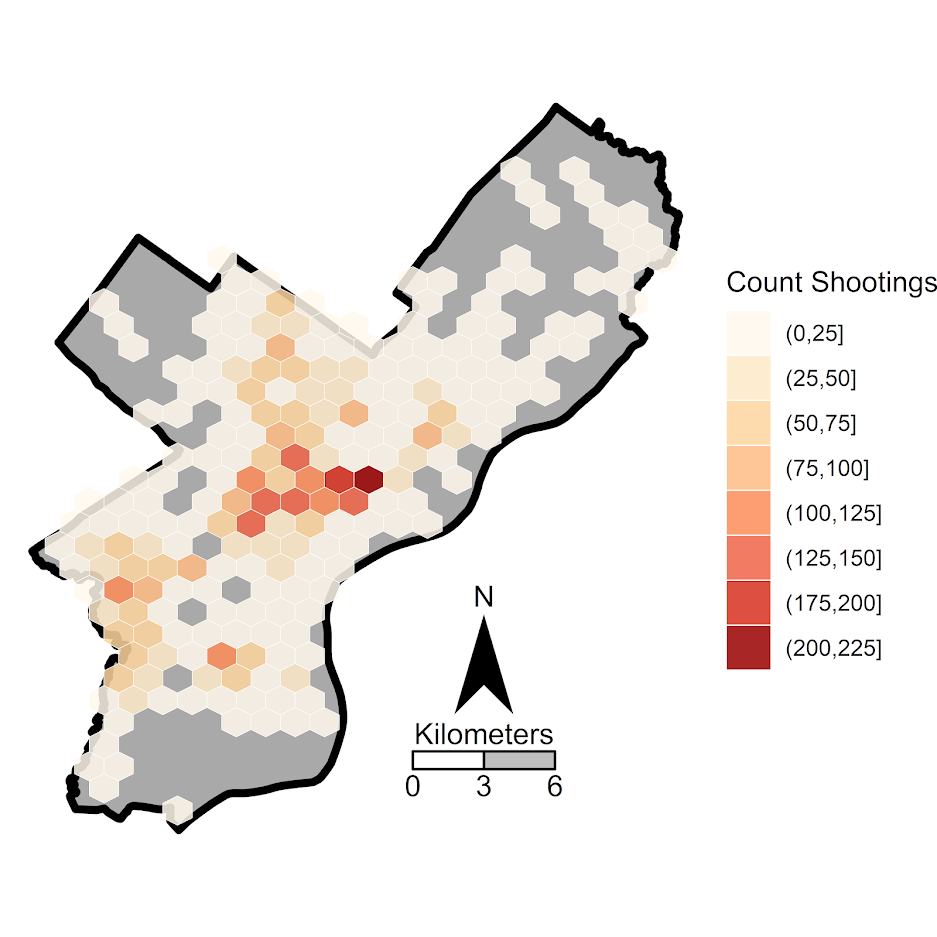
scale_fill_brewer(name="Count Shootings", palette="OrRd")We have come so far, now to automate exporting the figure to a PNG file. I’ve had trouble getting journals recently to not bungle vector figures that I forward them, so I am just like going with high res PNG to avoid that hassle. If you render the figure and use the GUI to export to PNG, it won’t be as high resolution, so you can often easily see aliasing pixels (e.g. the pixels in the North Arrow for the earlier base map image).
png('Philly_ShootCount.png', height=5, width=5, units="in", res=1000, type="cairo")
shoot_count
dev.off()
Note the font size/location in the exported PNG are often not quite exactly as they are when rendered in the RGUI window or RStudio on my windows machine. So make sure to check the PNG file.


2 Comments