Reducing folium map sizes

Recently for a crimede-coder project I have been building out a custom library to make nice leaflet maps using the python folium library. See the example I have posted on my website. Below is a screenshot:

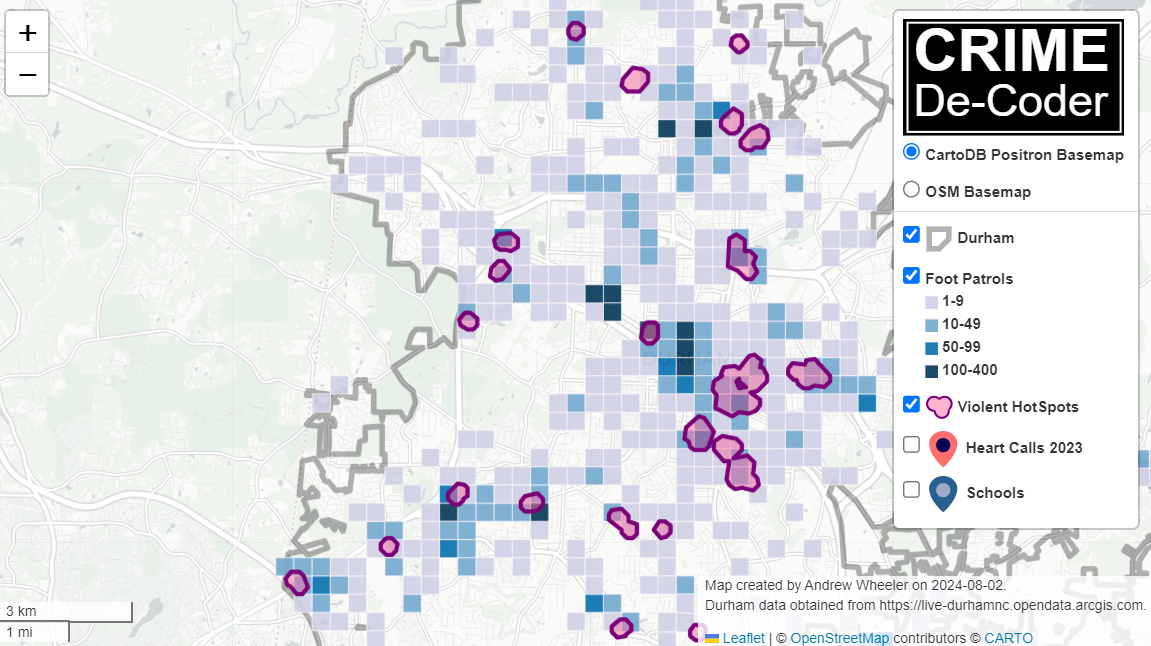
This map ended up having around 3000 elements in it, and was a total of 8mb. 8mb is not crazy to put on a website, but is at the stage where you can actually notice latency when first rendering the map.

Looking at the rendered html code though it was verbose in a few ways for every element. One is that lat/lon are in crazy precision by default, e.g. [-78.83229390597961, 35.94592660794455]. So a single polygon can have many of those. Six digits of precision for lat/lon is still under 1 meter of precision, which is plenty sufficient for my mapping applications. So you can reduce 8+ characters per lat/lon and not really make a difference to the map (you can technically have invalid polygons doing this, but this is really pedantic and should be fine).

A second part of the rendered folium html map for every object is given a full uuid, e.g. geo_json_a19eff2648beb3d74760dc0ddb58a73d.addTo(feature_group_2e2c6295a3a1c7d4c8d57d001c782482);. This again is not necessary. I end up reducing the 32 length uuids to the first 8 alphanumeric characters.

A final part is that the javascript is not minified – it has quite a bit of extra lines/spaces that are not needed. So here are my notes on using python code to take care of some of those pieces.

To clean up the precision for geometry objects, I do something like this.

import re

# geo is the geopandas dataframe
redg = geo.geometry.set_precision(10**-6).to_json()
# redg still has floats, below regex clips values
rs = r'(\d{2}\.|-\d{2}\.)(\d{6})(\d+)'
re.sub(rs,r'\1\2',redg)

As most of my functions add the geojson objects to the map one at a time (for custom actions/colors), this is sufficient to deal with that step (for markers, can round lat/lon directly). It may make more sense for the set precision to be 10**-5 and then clip the regex. (For these regex’s I am showing there is some risk they will replace something they should not, I think it will be pretty safe though.)

Then to clean up the UUID’s and extra whitespace, what I do is render the final HTML and then use regex’s:

# fol is the folium object
html = fol.get_root()
res = html.script.get_root().render()
# replace UUID with first 8
ru = r'([0-9a-f]{8})[0-9a-f]{4}[0-9a-f]{4}[0-9a-f]{4}[0-9a-f]{12}'
res = re.sub(ru,r'\1',res)
# clean up whitespace
rl = []
for s in res.split('\n'):
    ss = s.strip()
    if len(ss) > 0:
        rl.append(ss)
rlc = '\n'.join(rl)

There is probably a smarter way to do this directly with the folium object for the UUID’s. For whitespace though it would need to be after the HTML is written. You want to be careful with the cleaning up the whitespace step – it is possible you wanted blank lines in say a leaflet popup or tooltip. But for my purposes this is not really necessary.

Doing these two steps in the Durham map reduces the size of the rendered HTML from 8mb to 4mb. So reduced the size of the file by around 4 million characters! The savings will be even higher for maps with more elements.

One last part is my map has redundant svg inserted for the map markers. I may be able to use css to insert the svg, e.g. something like in css .mysvg {background-image: url("vector.svg");}, and then in the python code for the marker svg insert <div class="mysvg"></div>. For dense point maps this will also save quite a few characters. Or you could add in javascript to insert the svg as well (although that would be a bit sluggish I think relative to the css approach, although sluggish after first render if the markers are turned off).

I have not done this yet, as I need to tinker with getting the background svg to look how I want, but could save another 200-300 characters per marker icon. So will save a megabyte in the map for every 3000-5000 markers I am guessing.

The main reason I post webdemo’s on the crimede-coder site is that there a quite a few grifters in the tech space. Not just for data analysis, but for front-end development as well. I post stuff like that so you can go and actually see the work I do and its quality. There are quite a few people now claiming to be “data viz experts” who just embed mediocre Tableau or PowerBI apps. These apps in particular tend to produce very bad maps, so here you can see what I think a good map should look like.

If you want to check out all the interactions in the map, I posted a YouTube video walking through them

Durham hotspot map walkthrough of interactions

Notes on making Leaflet maps in R

The other day I wrote a blog post for crimrxiv about posting interactive graphics on their pre-print sharing service. I figured it would be good to share my notes on making interactive maps, and to date I’ve mostly created these using the R leaflet library.

The reason I like these interactive maps is they allow you to zoom in and look at hot spots of crime. With the slippy base maps you can then see, oh OK this hot spot is by a train station, or an apartment complex, etc. It also allows you to check out specific data labels via pop-ups as I will show.

I’m using data from my paper on creating cost of crime weighted hot spots in Dallas (that will be forthcoming in Police Quarterly soonish). But I have posted a more direct set of replicating code for the blog post here.

R Code

So first for the R libraries I am using, I also change the working directory to where I have my data located on my Windows machine.

##########################################################
#This code creates a nice leaflet map of my DBSCAN areas

library(rgdal)       #read in shapefiles
library(sp)          #spatial objects
library(leaflet)     #for creating interactive maps
library(htmlwidgets) #for exporting interactive maps

#will need to change baseLoc if replicating on your machine
baseLoc <- "D:\\Dropbox\\Dropbox\\Documents\\BLOG\\leaflet_R_examples\\Analysis"
setwd(baseLoc)
##########################################################

Second, I read in my shapefiles using the rgdal library. This is important, as it includes the projection information. To plot the spatial objects on a slippy map they need to be in the Web Mercator projection (or technically no projection, just a coordinate reference system for the globe). As another trick I like with these basemaps, for the outlined area (the Dallas boundary here), it is easier to plot as a line spatial object, as opposed to an empty filled polygon. You don’t need to worry about the order of the layers as much that way.

##########################################################
#Get the boundary data and DBSCAN data
boundary <- readOGR(dsn="Dallas_MainArea_Proj.shp",layer="Dallas_MainArea_Proj")
dbscan_areas <- readOGR(dsn="db_scan.shp",layer="db_scan")

#Now convert to WGS
DalLatLon <- spTransform(boundary,CRS("+init=epsg:4326"))
DallLine <- as(DalLatLon, 'SpatialLines') #Leaflet useful for boundaries to be lines instead of areas
dbscan_LatLon <- spTransform(dbscan_areas,CRS("+init=epsg:4326") )

#Quick and Dirty plot to check projections are OK
plot(DallLine)
plot(dbscan_LatLon,add=TRUE,col='blue')
##########################################################

Next part, I have a custom function I have made to make pop-up labels for these leaflet maps. First I need to read in a table with the data info for the hot spot areas and merge that into the spatial object. Then the way my custom function works is I pass it the dataset, then I have arguments for the variables I want, and the way I want them labeled. The function does the work of making the labels bolded and putting in line breaks into the HTML. (No doubt others have created nice libraries to do HTML tables/graphs inside the pop-ups that I am unaware of.) If you check out the final print statement, it shows the HTML it built for one of the labels, <strong>ID: </strong>1<br><strong>$ (Thousands): </strong>116.9<br><strong>PAI: </strong>10.3<br><strong>Street Length (Miles): </strong>0.4

##########################################################
#Function for labels

#read in data
crime_stats <- read.csv('ClusterStats_wlen.csv', stringsAsFactors=FALSE)
dbscan_stats <- crime_stats[crime_stats$type == 'DBSCAN',]
dbscan_stats$clus_id <- as.numeric(dbscan_stats$AreaStr) #because factors=False!

#merge into the dbscan areas
dbscan_LL <- merge(dbscan_LatLon,dbscan_stats)

LabFunct <- function(data,vars,labs){
  n <- length(labs)
  add_lab <- paste0("<strong>",labs[1],"</strong>",data[,vars[1]])
  for (i in 2:n){
    add_lab <- paste0(add_lab,"<br><strong>",labs[i],"</strong>",data[,vars[i]])
  }
  return(add_lab)
}

#create labels
vs <- c('AreaStr', 'val_th', 'PAI_valth_len', 'LenMile')
#Lazy, so just going to round these values
for (v in vs[-1]){
  dbscan_LL@data[,v] <- round(dbscan_LL@data[,v],1)
}  
lb <- c('ID: ','$ (Thousands): ','PAI: ','Street Length (Miles): ')
diss_lab <- LabFunct(dbscan_LL@data, vs, lb)

print(diss_lab[1]) #showing off just one
##########################################################

Now finally onto the hotspot map. This is a bit to chew over, so I will go through bit-by-bit.

##########################################################
HotSpotMap <- leaflet() %>%
  addProviderTiles(providers$OpenStreetMap, group = "Open Street Map") %>%
  addProviderTiles(providers$CartoDB.Positron, group = "CartoDB Lite") %>%
  addPolylines(data=DallLine, color='black', weight=4, group="Dallas Boundary") %>%
  addPolygons(data=dbscan_LL,color = "blue", weight = 2, opacity = 1.0, 
              fillOpacity = 0.5, group="DBSCAN Areas",popup=diss_lab, 
              highlight = highlightOptions(weight = 5,bringToFront = TRUE)) %>%
  addLayersControl(baseGroups = c("Open Street Map","CartoDB Lite"),
                   overlayGroups = c("Dallas Boundary","DBSCAN Areas"),
                   options = layersControlOptions(collapsed = FALSE))  %>%
  addScaleBar(position = "bottomleft", options = scaleBarOptions(maxWidth = 100, 
              imperial = TRUE, updateWhenIdle = TRUE))
                      
HotSpotMap #this lets you view interactively

#or save to a HTML file to embed in webpage
saveWidget(HotSpotMap,"HotSpotMap.html", selfcontained = TRUE)
##########################################################

First I create the empty leaflet() object. Because I am superimposing multiple spatial layers, I don’t worry about setting the default spatial layer. Second, I add in two basemap providers, OpenStreetMap and the grey scale CartoDB positron. Positron is better IMO for visualizing global data patterns, but the open street map is better for when you zoom in and want to see exactly what is around a hot spot area. Note when adding in a layer, I give it a group name. This allows you to later toggle which provider you want via a basegroup in the layers control.

Next I add in the two spatial layers, the Dallas Boundary lines and then the hot spots. For the DBSCAN hot spots, I include a pop-up diss_lab for the dbscan hot spot layer. This allows you to click on the polygon, and you get the info I stuffed into that label vector earlier. The HTML is to make it print nicely.

Finally then I add in a layers control, so you can toggle layers on/off. Basegroups mean that only one of the options can be selected, it doesn’t make sense to have multiple basemaps selected. Overlay you can toggle on/off as needed. Here the overlay doesn’t matter much due to the nature of the map, but if you have many layers (e.g. a hot spot map and a choropleth map of demographics) being able to toggle the layers on/off helps a bit more.

Then as a final touch I add in a scale bar (that automatically updates depending on the zoom level). These aren’t my favorite with slippy maps, as I’m not even 100% sure what location the scale bar refers to offhand (the center of the map? Or literally where the scale bar is located?) But when zoomed into smaller areas like a city I guess it is not misleading.

Here is a screenshot of this created map zoomed out to the whole city using the Positron grey scale base map. So it is tough to visualize the distribution of hot spots from this. If I wanted to do that in a static map I would likely just plot the hot spot centroids, and then make the circles bigger for areas that capture more crime.

But since we can zoom in, here is another screenshot zoomed in using the OpenStreetMap basemap, and also illustrating what my pop-up labels look like.

I’m too lazy to post this exact map, but it is very similar to one I posted for my actual hot spots paper if you want to check it out directly. I host it on GitHub for free.

Here I did not show how to make a choropleth map, but Jacob Kaplan in his R book has a nice example of that. And in the future I will have to update this to show how to do the same thing in python using the Folium library. I used Folium in this blog post if you want to dig into an example though for now.

Some more examples

For some other examples of what is possible in Leaflet maps in R, here are some examples I made for my undergrad Communities and Crime class. I had students submit prediction assignments (e.g. predict the neighborhood with the most crime in Dallas, predict the street segment in Oak Cliff with the most violent crime, predict the bar with the most crimes nearby, etc.) I would then show the class the results, as well as where other students predicted. So here are some screen shots of those maps.

Choropleth

Graduated Points

Street Segment Viz

Projecting spatial data in Python and R

I use my blog as sort of a scholarly notebook. I often repeatedly do a task, and then can’t find where I did it previously. One example is projecting crime data, so here are my notes on how to do that in python and R.

Commonly I want to take public crime data that is in spherical lat/lon coordinates and project it to some local projection. Most of the time so I can do simply euclidean geometry (like buffers within X feet, or distance to the nearest crime generator in meters). Sometimes you need to do the opposite — if I have the projected data and I want to plot the points on a webmap it is easier to work with the lat/lon coordinates. As a note, if you import your map data and then your points are not on the map (or in a way off location), there is some sort of problem with the projection.

I used to do this in ArcMap (toolbox -> Data Management -> Projections), but doing it these programs are faster. Here are examples of going back and forth for some Dallas coordinates. Here is the data and code to replicate the post.

Python

In python there is a library pyproj that does all the work you need. It isn’t part of the default python packages, so you will need to install it using pip or whatever. Basically you just need to define the to/from projections you want. Also it always returns the projected coordinates in meters, so if you want feet you need to do a conversions from meters to feet (or whatever unit you want). For below p1 is the definition you want for lat/lon in webmaps (which is not a projection at all). To figure out your local projection though takes a little more work.

To figure out your local projection I typically use this online tool, prj2epsg. You can upload a prj file, which is the locally defined projection file for shapefiles. (It is plain text as well, so you can just open in a text editor and paste into that site as well.) It will then tell you want EPSG code corresponds to your projection.

Below illustrates putting it all together and going back and forth for an example area in Dallas. I tend to write the functions to take one record at a time for use in various workflows, but I am sure someone can write a vectorized version though that will take whole lists that is a better approach.

import pyproj

#These functions convert to/from Dallas projection
#In feet to lat/lon
p1 = pyproj.Proj(proj='latlong',datum='WGS84')
p2 = pyproj.Proj(init='epsg:2276') #show how to figure this out, http://spatialreference.org/ref/epsg/ and http://prj2epsg.org/search 
met_to_feet = 3.280839895 #http://www.meters-to-feet.com/

#This converts Lat/Lon to projected coordinates
def DallConvProj(Lat,Lon):
    #always returns in meters
    if abs(Lat) > 180 or abs(Lon) > 180:
        return (None,None)
    else:
        x,y = pyproj.transform(p1, p2, Lon, Lat)
        return (x*met_to_feet, y*met_to_feet)

#This does the opposite, coverts projected to lat/lon
def DallConvSph(X,Y):
    if abs(X) < 2000000 or abs(Y) < 6000000:
        return (None,None)
    else:
        Lon,Lat = pyproj.transform(p2, p1, X/met_to_feet, Y/met_to_feet)
        return (Lon, Lat)

#check coordinates
x1 = -96.828295; y1 = 32.832521
print DallConvProj(Lat=y1,Lon=x1)

x2 = 2481939.934525765; y2 = 6989916.200679892
print DallConvSph(X=x2, Y=y2)

R

In R I use the library proj4 to do the projections for point data. R can read in the projection data from a file as well using the rgdal library.

library(proj4)
library(rgdal)

#read in projection from shapefile
MyDir <- "C:\\Users\\axw161530\\Dropbox\\Documents\\BLOG\\Projections_R_Python"
setwd(MyDir)
DalBound <- readOGR(dsn="DallasBoundary_Proj.shp",layer="DallasBoundary_Proj")
DalProj <- proj4string(DalBound)    

ProjData <- data.frame(x=c(2481939.934525765),
                       y=c(6989916.200679892),
                       lat=c(32.832521),
                       lon=c(-96.828295))
       
LatLon <- proj4::project(as.matrix(ProjData[,c('x','y')]), proj=DalProj, inverse=TRUE)
#check to see if true
cbind(ProjData[,c('lon','lat')],as.data.frame(LatLon))

XYFeet <- proj4::project(as.matrix(ProjData[,c('lon','lat')]), proj=DalProj)
cbind(ProjData[,c('x','y')],XYFeet)    

plot(DalBound)
points(ProjData$x,ProjData$y,col='red',pch=19,cex=2)

The last plot function shows that the XY point is within the Dallas basemap for the projected boundary. But if you want to project the boundary file as well, you can use the spTransform function. Here I have a simple example of tacking the projected boundary file and transforming to lat/lon, so can be superimposed on a leaflet map.

Additionally I show a trick I sometimes use for maps by transforming the boundary polygon to a polyline, as it provides easier styling options sometimes.

#transform boundary to lat/lon
DalLatLon <- spTransform(DalBound,CRS("+init=epsg:4326") )
plot(DalLatLon)
points(ProjData$lon,ProjData$lat,col='red',pch=19,cex=2)

#Leaflet useful for boundaries to be lines instead of areas
DallLine <- as(DalLatLon, 'SpatialLines')
library(leaflet)

BaseMapDallas <- leaflet() %>%
  addProviderTiles(providers$OpenStreetMap, group = "Open Street Map") %>%
  addProviderTiles(providers$CartoDB.Positron, group = "CartoDB Lite") %>%
  addPolylines(data=DallLine, color='black', weight=4, group="Dallas Boundary Lines") %>%
  addPolygons(data=DalLatLon,color = "#1717A1", weight = 1, smoothFactor = 0.5,
              opacity = 1.0, fillOpacity = 0.5, group="Dallas Boundary Area") %>%
  addLayersControl(baseGroups = c("Open Street Map","CartoDB Lite"),
                   overlayGroups = c("Dallas Boundary Area","Dallas Boundary Lines"),
                   options = layersControlOptions(collapsed = FALSE)) %>%
                   hideGroup("Dallas Boundary Lines")   
                      
BaseMapDallas

I have too much stuff in the blog queue at the moment, but hopefully I get some time to write up my notes on using leaflet maps in R soon.