Transforming KDE estimates from Logistic to Probability Scale in R

The other day I had estimates from several logistic regression models, and I wanted to superimpose the univariate KDE’s of the predictions. The outcome was fairly rare, so the predictions were bunched up at the lower end of the probability scale, and the default kernel density estimates on the probability scale smeared too much of the probability outside of the range.

It is a general problem with KDE estimates, and there are two general ways to solve it:

  • truncate the KDE and then reweight the points near the edge (example)
  • estimate the KDE on some other scale that does not have a restricted domain, and then transform the density back to the domain of interest (example)

The first is basically the same as edge correction in spatial statistics, just in one dimension instead of the two. Here I will show how to do the second in R, mapping items on the logistic scale to the probability scale. The second linked CV post shows how to do this when using the log transformation, and here I will show the same with mapping logistic estimates (e.g. from the output of a logistic regression model). This requires the data to not have any values at 0 or 1 on the probability scale, because these will map to negative and positive infinity on the logistic scale.

In R, first define the logit function as log(p/(1-p) and the logistic function as 1/(1+exp(-x)) for use later:

logistic <- function(x){1/(1+exp(-x))}
logit <- function(x){log(x/(1-x))}

We can generate some fake data that might look like output from a logistic regression model and calculate the density object.

set.seed(10)
x <- rnorm(100,0,0.5)
l <- density(x)  #calculate density on logit scale

This blog post goes through the necessary math, but in a nut shell you can’t simply just transform the density estimate using the same function, you need to apply an additional transformation (referred to as the Jacobian). So here is an example transforming the density estimate from the logistic scale, l above, to the probability scale.

px <- logistic(l$x)  #transform density to probability scale
py <- l$y/(px*(1-px))
plot(px,py,type='l')

To make sure that the area does sum to one, we can superimpose the density calculated on the data transformed to the probability scale. In this example of fake data the two are pretty much identical. (Black line is my transformed density, and the red is the density estimate based on the probability data.)

dp <- density(logistic(x)) #density on the probability values to begin with
lines(dp$x,dp$y,col='red')

Here is a helper function, denLogistic, to do this in the future, which simply takes the data (on the logistic scale) and returns a density object modified to the probability scale.

logistic <- function(x){1/(1+exp(-x))}
logit <- function(x){log(x/(1-x))}
denLogistic <- function(x){
  d <- density(x)
  d$x <- logistic(d$x)
  d$y <- d$y/(d$x*(1-d$x))
  d$call <- 'Logistic Density Transformed to Probability Scale'
  d$bw <- paste0(signif(d$bw,4)," (on Logistic scale)")
  return(d)
}

In cases where more of the probability density is smeared beyond 0-1 on the probability scale, the logistic density estimate will look different. Here is an example with a wider variance and more predictions near zero, so the two estimates differ by a larger amount.

lP <- rnorm(100,-0.9,1)
test <- denLogistic(lP)
plot(test)
lines(density(logistic(lP)),col='red')

Again, this works well for data on the probability scale that can not be exactly zero or one. If you have data like that, the edge correction type KDE estimators are better suited.

Estimating group based trajectory models using SPSS and R

For a project I have been estimating group based trajectory models for counts of crime at micro places. Synonymous with the trajectory models David Weisburd and colleagues estimated for street segments in Seattle. Here I will show how using SPSS and the R package crimCV one can estimate similar group based trajectory models. Here is the crimCV package help and here is a working paper by the authors on the methodology. The package specifically estimates a zero inflated poisson model with the options to make the 0-1 part and/or the count part have quadratic or cubic terms – and of course allows you specify the number of mixture groups to search for.

So first lets make a small set of fake data to work with. I will make 100 observations with 5 time points. The trajectories are three separate groups (with no zero inflation).

*Make Fake data.
SET SEED 10.
INPUT PROGRAM.
LOOP Id = 1 TO 100.
END CASE.
END LOOP.
END FILE.
END INPUT PROGRAM.
DATASET NAME OrigData.
*Make 3 fake trajectory profiles.
VECTOR Count(5,F3.0).
DO REPEAT Count = Count1 TO Count5 /#iter = 1 TO 5.
COMPUTE #i = #iter - 3.
COMPUTE #ii  = #i**2.
COMPUTE #iii = #i**3.
  DO IF Id <= 30.
    COMPUTE #P    = 10 + #i*0.3 + #ii*-0.1 + #iii*0.05.
    COMPUTE Count = RV.POISSON(#P).
  ELSE IF Id <=60.
    COMPUTE #P    =  5 + #i*-0.8 + #ii*0.3 + #iii*0.05.
    COMPUTE Count = RV.POISSON(#P).
  ELSE. 
    COMPUTE #P    =  4 + #i*0.8 + #ii*-0.5 + #iii*0.
    COMPUTE Count = RV.POISSON(#P).
  END IF.
END REPEAT.
FORMATS Id Count1 TO Count5 (F3.0).
EXECUTE.

Note The crimCV package wants the data to be wide format for the models, that is each separate time point in its own column. Now we can call R code using BEGIN PROGRAM R to recreate the wide SPSS dataset in an R data frame.

*Recreate SPSS data in R data frame.
BEGIN PROGRAM R.
casedata <- spssdata.GetDataFromSPSS(variables=c("Id","Count1","Count2",
                                                "Count3","Count4","Count5")) #grab data from SPSS
casedataMat <- as.matrix(casedata[,2:6]) #turn into matrix
#summary(casedata) #check contents
#casedataMat[1:10,1:5]
END PROGRAM.

Now to fit one model with 3 groups (without calculating the cross validation statistics) the code would be as simple as:

*Example estimating model with 3 groups and no CV.
BEGIN PROGRAM R.
library(crimCV)
crimCV(casedataMat,3,rcv=FALSE,dpolyp=3,dpolyl=3)
END PROGRAM.

But when we are estimating these group based trajectory models we don’t know the number of groups in advance. So typically one progressively fits more groups and then uses model selection criteria to pick the mixture solution that best fits the data. Here is a loop I created to successively estimate models with more groups and stuffs the models results in a list. It also makes a separate data frame that saves the model fit statistics, so you can see which solution fits the best (at least based on these statistics). Here I loop through estimates of 1 through 4 groups (this takes about 2 minutes in this example). Be warned – here are some bad programming practices in R (the for loops are defensible, but growing the lists within the loop is not – they are small though in my application and I am lazy).

*looping through models 1 through 4.
BEGIN PROGRAM R.
results <- c()  #initializing a set of empty lists to store the seperate models
measures <- data.frame(cbind(groups=c(),llike=c(),AIC=c(),BIC=c(),CVE=c())) #nicer dataframe to check out model 
                                                                            #model selection diagnostics
max <- 4 #this is the number of grouping solutions to check

#looping through models
for (i in 1:max){
    model <- crimCV(casedataMat,i,rcv=TRUE,dpolyp=3,dpolyl=3)
    results <- c(results, list(model))
    measures <- rbind(measures,data.frame(cbind(groups=i,llike=model$llike,
                                          AIC=model$AIC,BIC=model$BIC,CVE=model$cv)))
    #save(measures,results,file=paste0("Traj",as.character(i),".RData")) #save result
    }
#table of the model results
measures
END PROGRAM.

In my actual application the groups take a long time to estimate, so I have the commented line saving the resulting list in a file. Also if the model does not converge it breaks the loop. So here we see that the mixture with 3 groups is the best fit according to the CVE error, but the 2 group solution would be chosen by AIC or BIC criteria. Just for this tutorial I will stick with the 3 group solution. We can plot the predicted trajectories right within R by selecting the nested list.

*plot best fitting model.
BEGIN PROGRAM R.
plot(results[[3]])
#getAnywhere(plot.dmZIPt) #this is the underlying code
END PROGRAM.

Now the particular object that stores the probabilities is within the gwt attribute, so we can transform this to a data frame, merge in the unique identifier, and then use the STATS GET R command to grab the resulting R data frame back into an SPSS dataset.

*Grab probabiltiies back SPSS dataset.
BEGIN PROGRAM R.
myModel <- results[[3]] #grab model
myDF <- data.frame(myModel$gwt) #probabilites into dataframe
myDF$Id <- casedata$Id #add in Id
END PROGRAM.
*back into SPSS dataset.
STATS GET R FILE=* /GET DATAFRAME=myDF DATASET=TrajProb.

Then we can merge this R data frame into SPSS. After that, we can classify the observations into groups based on the maximum posterior probability of belonging to a particular group.

*Merge into original dataset, and the assign groups.
DATASET ACTIVATE OrigData.
MATCH FILES FILE = *
  /FILE = 'TrajProb'
  /BY ID
  /DROP row.names.
DATASET CLOSE TrajProb.
*Assign group based on highest prob.
*If tied last group wins.
VECTOR X = X1 TO X3.
COMPUTE #MaxProb = MAX(X1 TO X3).
LOOP #i = 1 TO 3.
  IF X(#i) = #MaxProb Group = #i.
END LOOP.
FORMATS Group (F1.0).

Part of the motivation for doing this is not only to replicate some of the work of Weisburd and company, but that it has utility for identifying long term hot spots. Part of what Weisburd (and similarly I am) finding is that crime at small places is pretty stable over long periods of time. So we don’t need to make up to date hotspots to allocate police resources, but are probably better off looking at crime over much longer periods to identify places for targeted strategies. Trajectory models are a great tool to help identify those long term high crime places, same as geographic clustering is a great tool to help identify crime hot spots.

Jittered scatterplots with 0-1 data

Scatterplots with discrete variables and many observations take some touches beyond the defaults to make them useful. Consider the case of a categorical outcome that can only take two values, 0 and 1. What happens when we plot this data against a continuous covariate with my default chart template in SPSS?

Oh boy, that is not helpful. Here is the fake data I made and the GGRAPH code to make said chart.

*Inverse logit - see.
*https://andrewpwheeler.wordpress.com/2013/06/25/an-example-of-using-a-macro-to-make-a-custom-data-transformation-function-in-spss/.
DEFINE !INVLOGIT (!POSITIONAL  !ENCLOSE("(",")") ) 
1/(1 + EXP(-!1))
!ENDDEFINE.

SET SEED 5.
INPUT PROGRAM.
LOOP #i = 1 TO 1000.
  COMPUTE X = RV.UNIFORM(0,1).
  DO IF X <= 0.2.
    COMPUTE YLin = -0.5 + 0.3*(X-0.1) - 4*((X-0.1)**2).
  ELSE IF X > 0.2 AND X < 0.8.
    COMPUTE YLin = 0 - 0.2*(X-0.5) + 2*((X-0.5)**2) - 4*((X-0.5)**3).
  ELSE.
      COMPUTE YLin = 3 + 3*(X - 0.9).
  END IF.
  COMPUTE #YLin = !INVLOGIT(YLin).
  COMPUTE Y = RV.BERNOULLI(#YLin).
  END CASE.
END LOOP.
END FILE.
END INPUT PROGRAM.
DATASET NAME NonLinLogit.
FORMATS Y (F1.0) X (F2.1).

*Original chart.
GGRAPH
  /GRAPHDATASET NAME="graphdataset" VARIABLES=X Y
  /GRAPHSPEC SOURCE=INLINE.
BEGIN GPL
  SOURCE: s=userSource(id("graphdataset"))
  DATA: X=col(source(s), name("X"))
  DATA: Y=col(source(s), name("Y"))
  GUIDE: axis(dim(1), label("X"))
  GUIDE: axis(dim(2), label("Y"))
  ELEMENT: point(position(X*Y))
END GPL.

So here we will do a few things to the chart to make it easier to interpret:

SPSS can jitter the points directly within GGRAPH code (see point.jitter), but here I jitter the data slightly myself a uniform amount. The extra aesthetic options for making points smaller and semi-transparent are at the end of the ELEMENT statement.

*Making a jittered chart.
COMPUTE YJitt = RV.UNIFORM(-0.04,0.04) + Y.
FORMATS Y YJitt (F1.0).
GGRAPH
  /GRAPHDATASET NAME="graphdataset" VARIABLES=X Y YJitt
  /GRAPHSPEC SOURCE=INLINE.
BEGIN GPL
  SOURCE: s=userSource(id("graphdataset"))
  DATA: X=col(source(s), name("X"))
  DATA: Y=col(source(s), name("Y"))
  DATA: YJitt=col(source(s), name("YJitt"))
  GUIDE: axis(dim(1), label("X"))
  GUIDE: axis(dim(2), label("Y"), delta(1), start(0))
  SCALE: linear(dim(2), min(-0.05), max(1.05))
  ELEMENT: point(position(X*YJitt), size(size."3"), 
           transparency.exterior(transparency."0.7"))
END GPL.

If I made the Y axis categorical I would need to use point.jitter in the inline GPL code because SPSS will always force the categories to the same spot on the axis. But since I draw the Y axis as continuous here I can do the jittering myself.

A useful tool for exploratory data analysis is to add a smoothing term to plot – a local estimate of the mean at different locations of the X-axis. No binning necessary, here is an example using loess right within the GGRAPH call. The red line is the smoother, and the blue line is the actual proportion I generated the fake data from. It does a pretty good job of identifying the discontinuity at 0.8, but the change points earlier are not visible. Loess was originally meant for continuous data, but for exploratory analysis it works just fine on the 0-1 data here. See also smooth.mean for 0-1 data.

*Now adding in a smoother term.
COMPUTE ActualFunct = !INVLOGIT(YLin).
FORMATS Y YJitt ActualFunct (F2.1).
GGRAPH
  /GRAPHDATASET NAME="graphdataset" VARIABLES=X Y YJitt ActualFunct
  /GRAPHSPEC SOURCE=INLINE.
BEGIN GPL
  SOURCE: s=userSource(id("graphdataset"))
  DATA: X=col(source(s), name("X"))
  DATA: Y=col(source(s), name("Y"))
  DATA: YJitt=col(source(s), name("YJitt"))
  DATA: ActualFunct=col(source(s), name("ActualFunct"))
  GUIDE: axis(dim(1), label("X"))
  GUIDE: axis(dim(2), label("Y"), delta(0.2), start(0))
  SCALE: linear(dim(2), min(-0.05), max(1.05))
  ELEMENT: point(position(X*YJitt), size(size."3"), 
           transparency.exterior(transparency."0.7"))
  ELEMENT: line(position(smooth.loess(X*Y, proportion(0.2))), color(color.red))
  ELEMENT: line(position(X*ActualFunct), color(color.blue))
END GPL.

SPSS’s default smoothing is alittle too smoothed for my taste, so I set the proportion of the X variable to use in estimating the mean within the position statement.

I wish SPSS had the ability to draw error bars around the smoothed means (you can draw them around the linear regression lines with quadratic or cubic polynomial terms, but not around the local estimates like smooth.loess or smooth.mean). I realize they are not well defined and rarely have coverage properties of typical regression estimators – but I rather have some idea about the error than no idea. Here is an example using the ggplot2 library in R. Of course we can work the magic right within SPSS.

BEGIN PROGRAM R.
#Grab Data
casedata <- spssdata.GetDataFromSPSS(variables=c("Y","X"))
#ggplot smoothed version
library(ggplot2)
library(splines)
MyPlot <- ggplot(aes(x = X, y = Y), data = casedata) + 
          geom_jitter(position = position_jitter(height = .04, width = 0), alpha = 0.1, size = 2) +
          stat_smooth(method="glm", family="binomial", formula = y ~ ns(x,5))
MyPlot
END PROGRAM.

To accomplish the same thing in SPSS you can estimate restricted cubic splines and then use any applicable regression procedure (e.g. LOGISTIC, GENLIN) and save the predicted values and confidence intervals. It is pretty easy to call the R code though!

I haven’t explored the automatic linear modelling, so let me know in the comments if there is a simply way right in SPSS to get explore such non-linear predictions.

The mad scientist workflow: Some examples of using python and R within SPSS

I figured I would share some of the scripts I have been recently working on to produce a set of figures on a regular basis for reports. SPSS GGRAPH can not be directly parameterized within macro’s (at least without a lot of work – see a counter example of Marta Garcia-Granero’s macro for Kalbfleisch-Prentice 95%CI for survival), but can be called using python code. Jon Peck has some examples at the Developerworks blog, and here I will show some more! I am also going to show how to make some automated maps in R using the ggmap package, with which you can grab various basemap tiles from online and superimpose point data.

So lets provide some example data to work with.

DATA LIST FREE / Id (A1) Crime (A8) Hour (F2.0) Lon Lat (2F16.8). BEGIN DATA 1 Robbery 18 -74.00548939 41.92961837 2 Robbery 19 -73.96800055 41.93152595 3 Robbery 19 -74.00755075 41.92996862 4 Burglary 11 -74.01183343 41.92925202 5 Burglary 12 -74.00708100 41.93262613 6 Burglary 14 -74.00923393 41.92667552 7 Burglary 12 -74.00263453 41.93267197 END DATA. DATASET NAME Crimes.

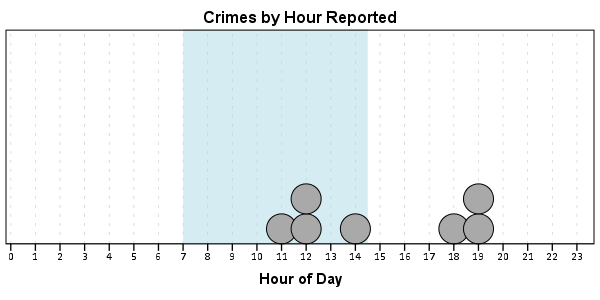
And now let’s say you want to make a graph of the hours of the day that Robberies occur in. Many small to mid-range police departments have few serious crimes when examining over shorter time spans (like a week or a month). So one type of chart I like to use are histogram like dot plots. Here is an example for the entire dataset in question.

GGRAPH /GRAPHDATASET NAME="graphdataset" VARIABLES=Hour MISSING=LISTWISE REPORTMISSING=NO /GRAPHSPEC SOURCE=INLINE. BEGIN GPL PAGE: begin(scale(600px,300px)) SOURCE: s=userSource(id("graphdataset")) DATA: Hour=col(source(s), name("Hour")) TRANS: bottom=eval(0) TRANS: top=eval(10) TRANS: begin=eval(7) TRANS: end=eval(14.5) COORD: rect(dim(1,2)) GUIDE: axis(dim(1), label("Hour of Day"), delta(1)) GUIDE: axis(dim(2), null()) GUIDE: text.title(label("Crimes by Hour Reported")) SCALE: linear(dim(1), min(1), max(22.5)) SCALE: linear(dim(2), min(0), max(3)) ELEMENT: polygon(position(link.hull((begin+end)*(bottom+top))), color.interior(color.lightblue), transparency.interior(transparency."0.5"), transparency.exterior(transparency."1")) ELEMENT: point.dodge.asymmetric(position(bin.dot(Hour, dim(1), binWidth(1))), color.interior(color.darkgrey), size(size."30")) PAGE: end() END GPL.

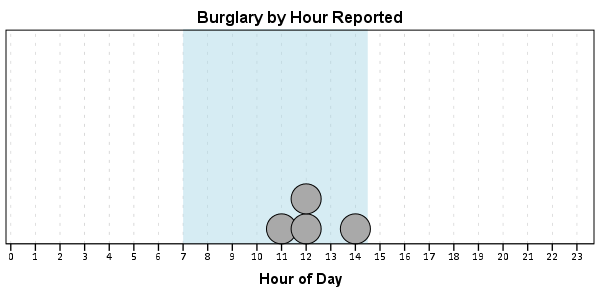
One of the things I like to do though is to make charts for different subsets of the data. One way is to use FILTER to only plot a subset of the data, but a problem with this approach is the fixed aspects of the chart, like the title, do not change to reflect the current data. Here I will use FILTER in combination with a python BEGIN PROGRAM ... END PROGRAM block to grab the crime type to insert into the title of the graph.

COMPUTE Bur = (Crime = "Burglary"). FILTER BY Bur. BEGIN PROGRAM. import spss MyVars = [1] dataCursor=spss.Cursor(MyVars) MyData=dataCursor.fetchone() dataCursor.close() CrimeType = MyData[0].strip() print CrimeType END PROGRAM. FILTER OFF.

So when grabbing the SPSS case data, python respects the current FILTER on the dataset. First I set an array, MyVars, to grab the variables I want. Here I only want the Crime variable, which is the second variable in the dataset. Python’s arrays are indexed at zero, so I end up wanting the variable in the [1] position. Then SPSS has a set of functions to grab data out of the active dataset using spss.Cursor. What I do is use the fetchone() object property to only grab the first row of data, and assign it the name MyData. Then after closing the cursor using dataCursor.close(), I access the string that is in the first location in the array MyData and use the strip() property to clean up trailing blanks in the string (see this example on Stackoverflow for where this was handy). When running the above code you can see that it prints Burglary, even though the burglary cases are not the first ones in the dataset. Now we can extend this example to insert the chart title and submit the GGRAPH syntax.

FILTER BY Bur. BEGIN PROGRAM. import spss MyVars = [1] dataCursor=spss.Cursor(MyVars) MyData=dataCursor.fetchone() dataCursor.close() CrimeType = MyData[0].strip() spss.Submit(""" GGRAPH /GRAPHDATASET NAME="graphdataset" VARIABLES=Hour MISSING=LISTWISE REPORTMISSING=NO /GRAPHSPEC SOURCE=INLINE. BEGIN GPL PAGE: begin(scale(600px,300px)) SOURCE: s=userSource(id("graphdataset")) DATA: Hour=col(source(s), name("Hour")) TRANS: bottom=eval(0) TRANS: top=eval(10) TRANS: begin=eval(7) TRANS: end=eval(14.5) COORD: rect(dim(1,2)) GUIDE: axis(dim(1), label("Hour of Day"), delta(1)) GUIDE: axis(dim(2), null()) GUIDE: text.title(label("%s by Hour Reported")) SCALE: linear(dim(1), min(1), max(22.5)) SCALE: linear(dim(2), min(0), max(3)) ELEMENT: polygon(position(link.hull((begin+end)*(bottom+top))), color.interior(color.lightblue), transparency.interior(transparency."0.5"), transparency.exterior(transparency."1")) ELEMENT: point.dodge.asymmetric(position(bin.dot(Hour, dim(1), binWidth(1))), color.interior(color.darkgrey), size(size."30")) PAGE: end() END GPL. """ %(CrimeType)) END PROGRAM. FILTER OFF.

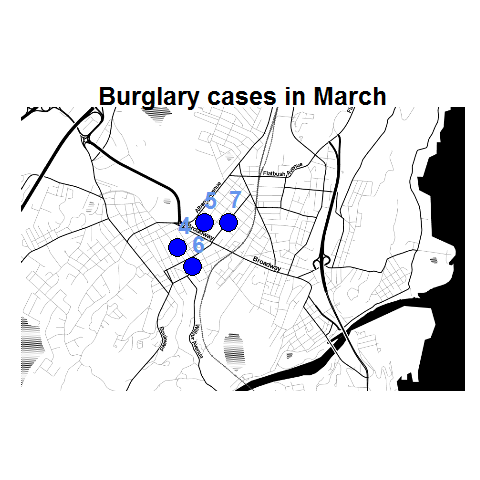
You can do this same process for calling R commands, as again grabbing the case data from SPSS respects the current FILTER or (TEMPORARY + SELECT IF). One favorite of mine recently is to make automated maps using the ggmap library. Grabbing the online tiles makes my job of making a nice background much easier. Here is an example of grabbing case data from SPSS and placing the locations on the map (note this is made up data, these aren’t actual crime locations in Kingston!)

FILTER BY Bur. BEGIN PROGRAM R. #using ggmap to make a basemap library(ggmap) loc <- c(left = -74.04, bottom = 41.91, right = -73.960, top = 41.948) KingstonBasemap <- get_map(location = loc, zoom = 14, maptype = "toner", source = "stamen") #setting styles for ggplot map axisStyle <- theme(axis.text.y=element_blank(),axis.text.x=element_blank(), axis.ticks=element_blank(),axis.title.x=element_blank(), axis.title.y=element_blank() ) titleStyle <- theme(plot.title = element_text(face="bold", size=25)) #now grabbing SPSS data casedata <- spssdata.GetDataFromSPSS(variables=c("Id","Crime","Lon","Lat")) TypeCrime <- as.character(casedata$Crime[1]) #grabs first case for chart title #Data to put on the map point <- geom_point(aes(x = Lon, y = Lat), data=casedata, shape=21, size = 9, fill = "Blue") labels <- geom_text(aes(x = Lon, y = Lat, label = as.character(Id)), data=casedata, hjust = -0.03, vjust = -0.8, size = 8, fontface=2, color="cornflowerblue" ) title <- labs(title=paste0(TypeCrime," cases in March")) #Putting all together CrimeMap <- ggmap(KingstonBasemap) + point + labels + axisStyle + titleStyle + title CrimeMap END PROGRAM. FILTER OFF.

To make the map look nice takes a bit of code, but all of the action with grabbing data from SPSS and setting the string I want to use in my chart title are in the two lines of code after the #now grabbing SPSS data comment. (Note I like using Stamen base maps as they allow one to grab non-square tiles. I typically like to use the terrain map – not because the terrain is necessary but just because I like the colors – but I’ve been having problems using the terrain tiles.)

Basically the set up I have now is to place some arbitrary code for graphs and maps in a separate syntax file. So all I need to do set the filter, use INSERT, and then turn the filter off. I can then add graphs for any subsets I am interested in. I have a separate look up table that stashes all the necessary metadata I want for use in the plots for whatever particular categories, which in addition to titles include other chart aesthetics like sizes for point elements or colors. In the future I will have to explore more options for using the SPLIT FILE facilities that both python and R offer when working with SPSS case data, but this is pretty simple and generalizes to non-overlapping groups as well.